Chapter 2: Getting started with Python: Miniforge, VS Code and conda environments
The Integrated Development Environment (IDE)
“IDE” what? Wikipedia defines it as follows:
An integrated development environment (IDE) is a software application that provides comprehensive facilities to computer programmers for software development. An IDE normally consists of at least a source code editor, build automation tools and a debugger. An IDE normally consists of at least a source code editor, build automation tools and a debugger.
en.wikipedia.org
Hence, an IDE mainly consists of a source code editor, build automation tools (e.g., integrated in a terminal/console) and a debugger.
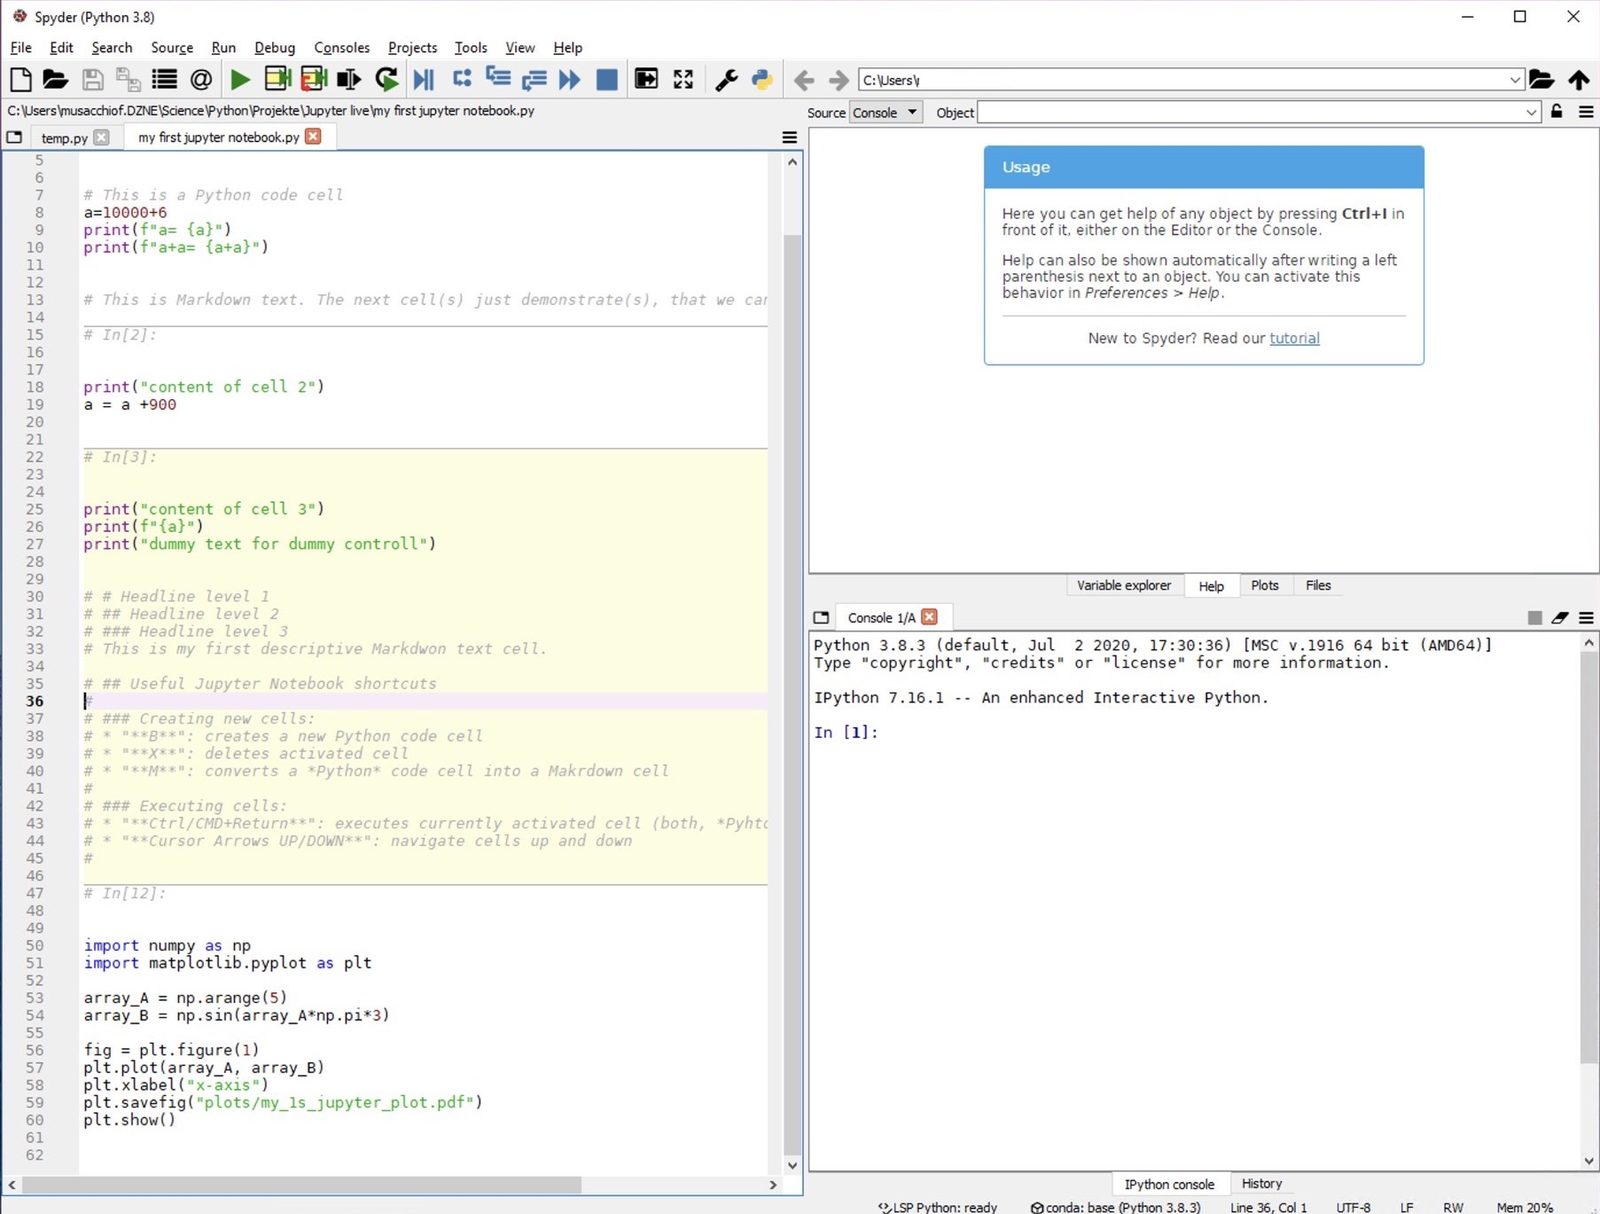
Available are all-in-one Python-specific solutions, e.g., Spyder via Anaconda, PyCharm, Visual Studio Code and many more. You can find a broader overview here ꜛ.
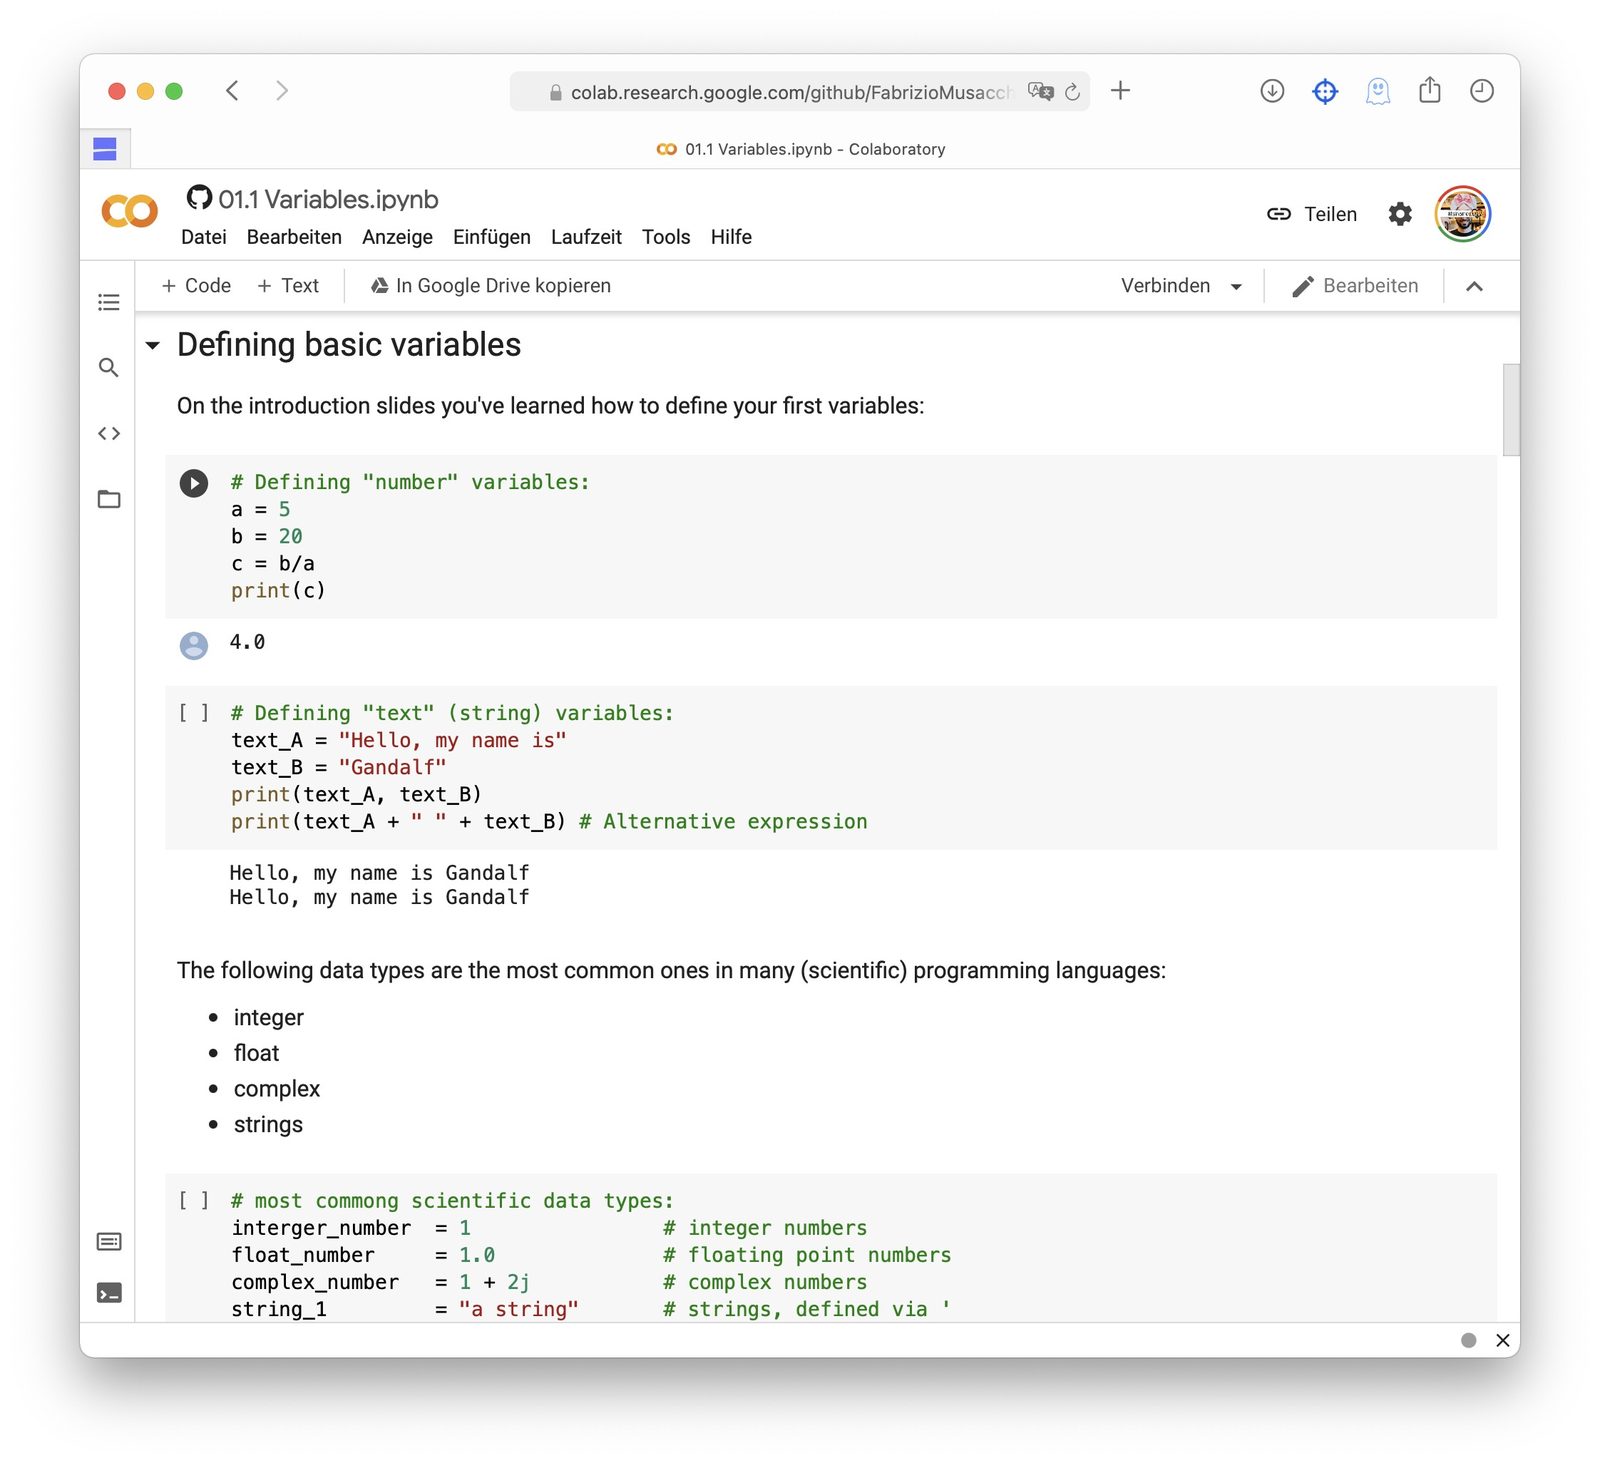
there are also online solutions like Google Colab ꜛ:
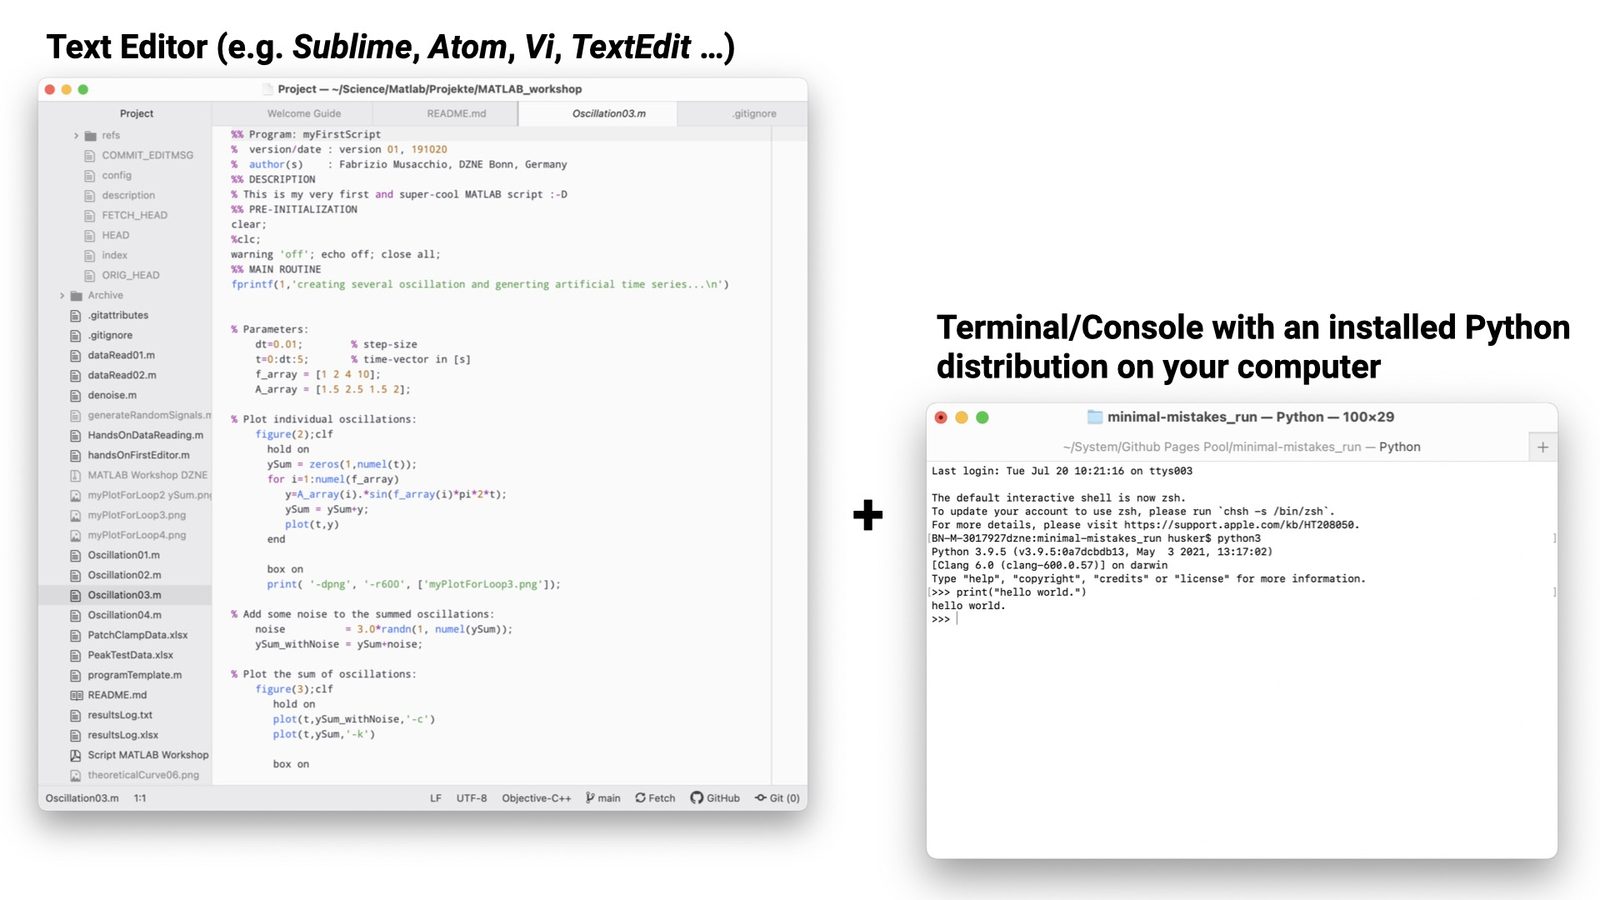
But in principle, you can use any text editor and the terminal/console of your operating system (with an installed Python version).
VS Code and Miniforge
In this course, we will use VS Code together with Miniforge:

The conda-forge logo (a stylized anvil). conda-forge is a community-driven collection of recipes for building conda packages. It provides a wide range of packages that are not available in the default Anaconda repository, making it a valuable resource for users who need specific software or libraries. Read more about in this blog post. Source: conda-forge.orgꜛ (modified).
- both are free and open-source,
- Miniforge provides a lightweight Python distribution and package manager,
- VS Code is a modern and widely used editor for Python and many other languages,
- VS Code supports scripts, terminals, and Jupyter notebooks in one environment,
- package management with
condais straightforward, and - both can be installed on macOS, Windows, and Linux.
We will use VS Code as our main Python IDE during the course and Miniforge to manage Python and additional packages.
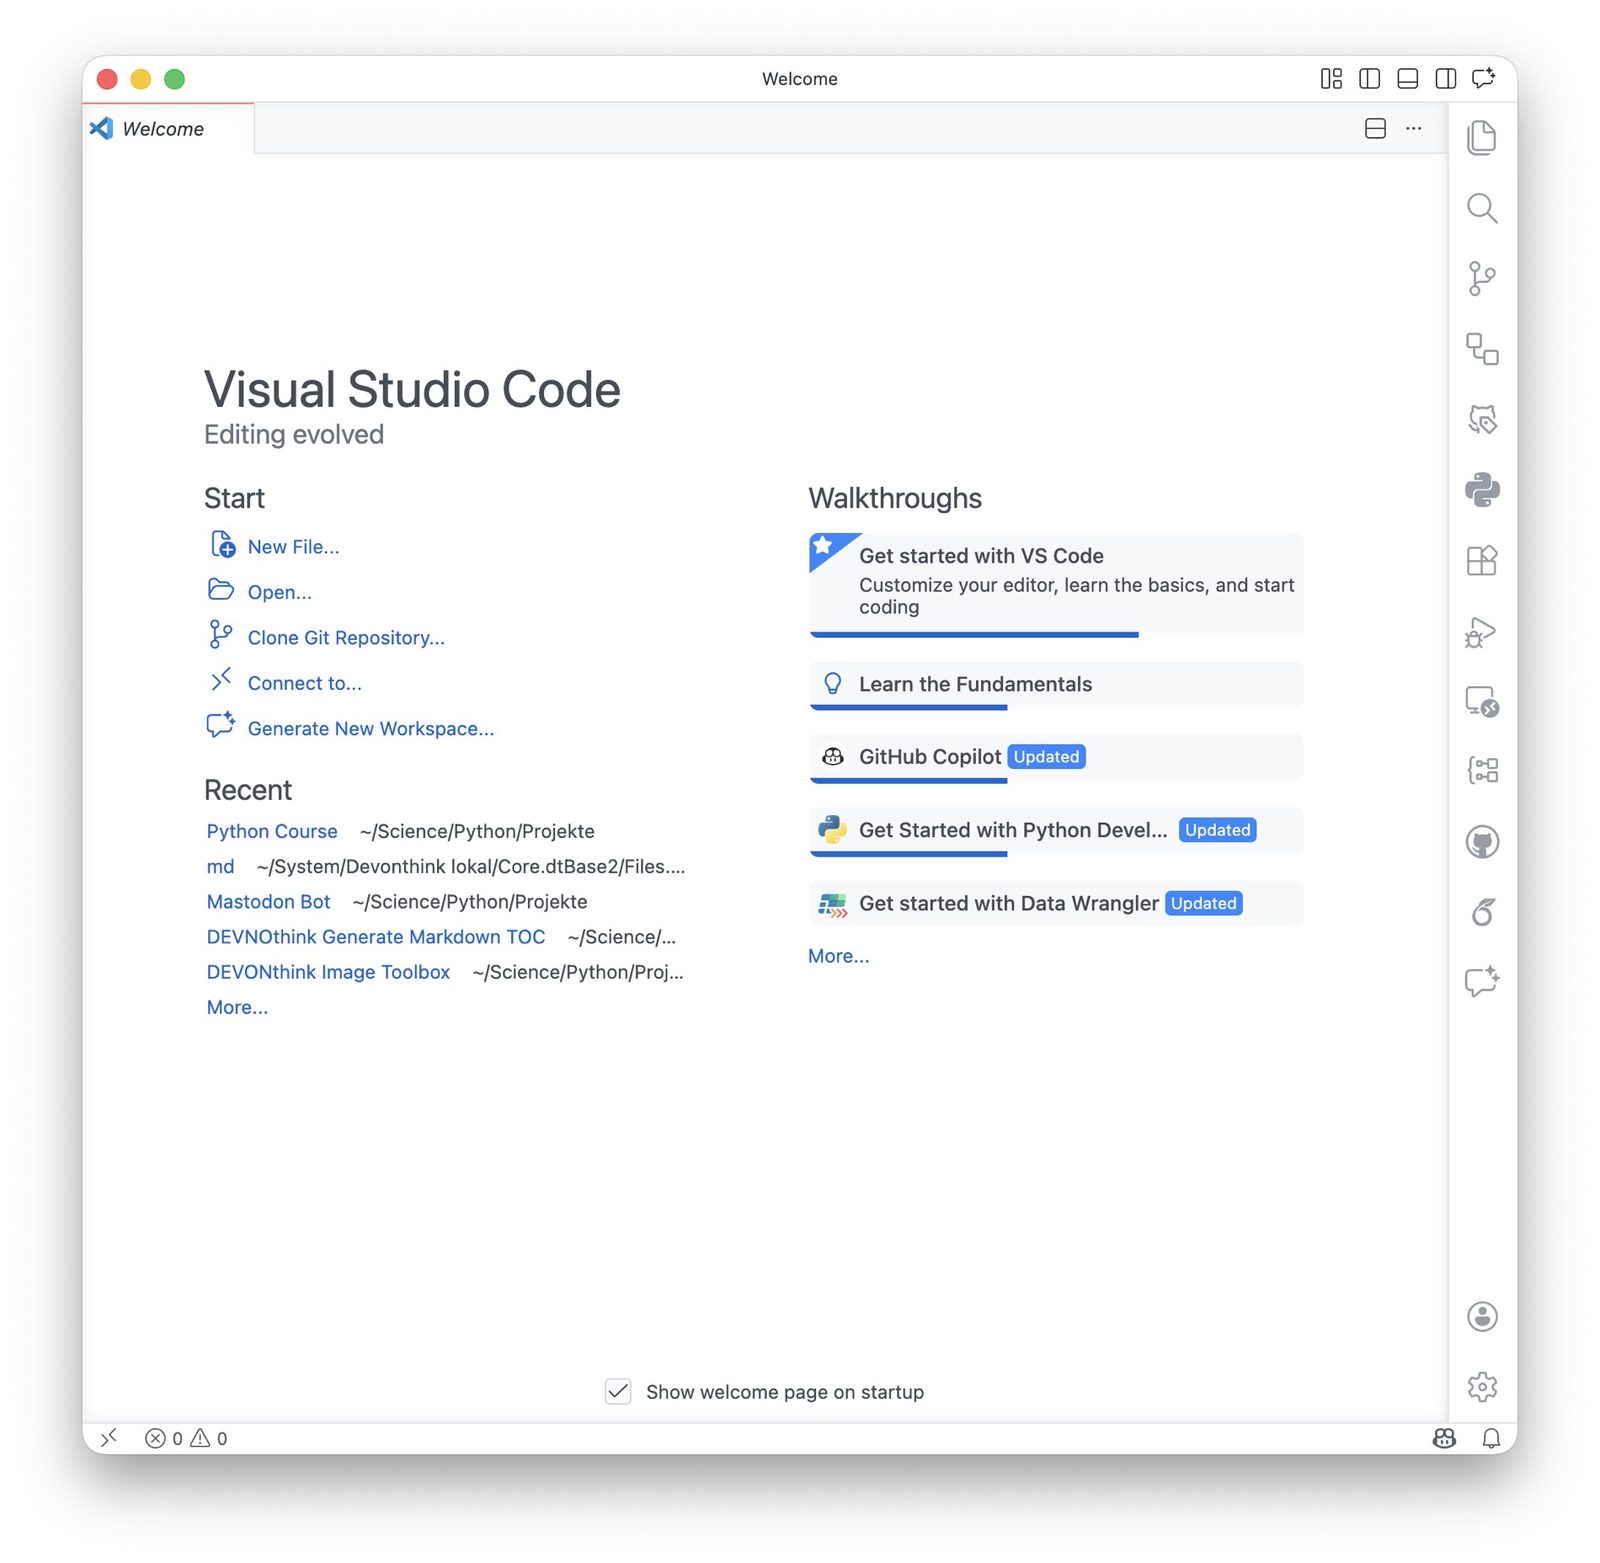
VS Code main window (may differ depending on your setup).
Please install the following in advance:
The Python Environments extensionꜛ is also recommended, as it can simplify working with conda environments.
VS Code
Let’s launch VS Code. After opening VS Code, you should see the main window with the file explorer on the left, the editor area in the center, and the status bar at the bottom.
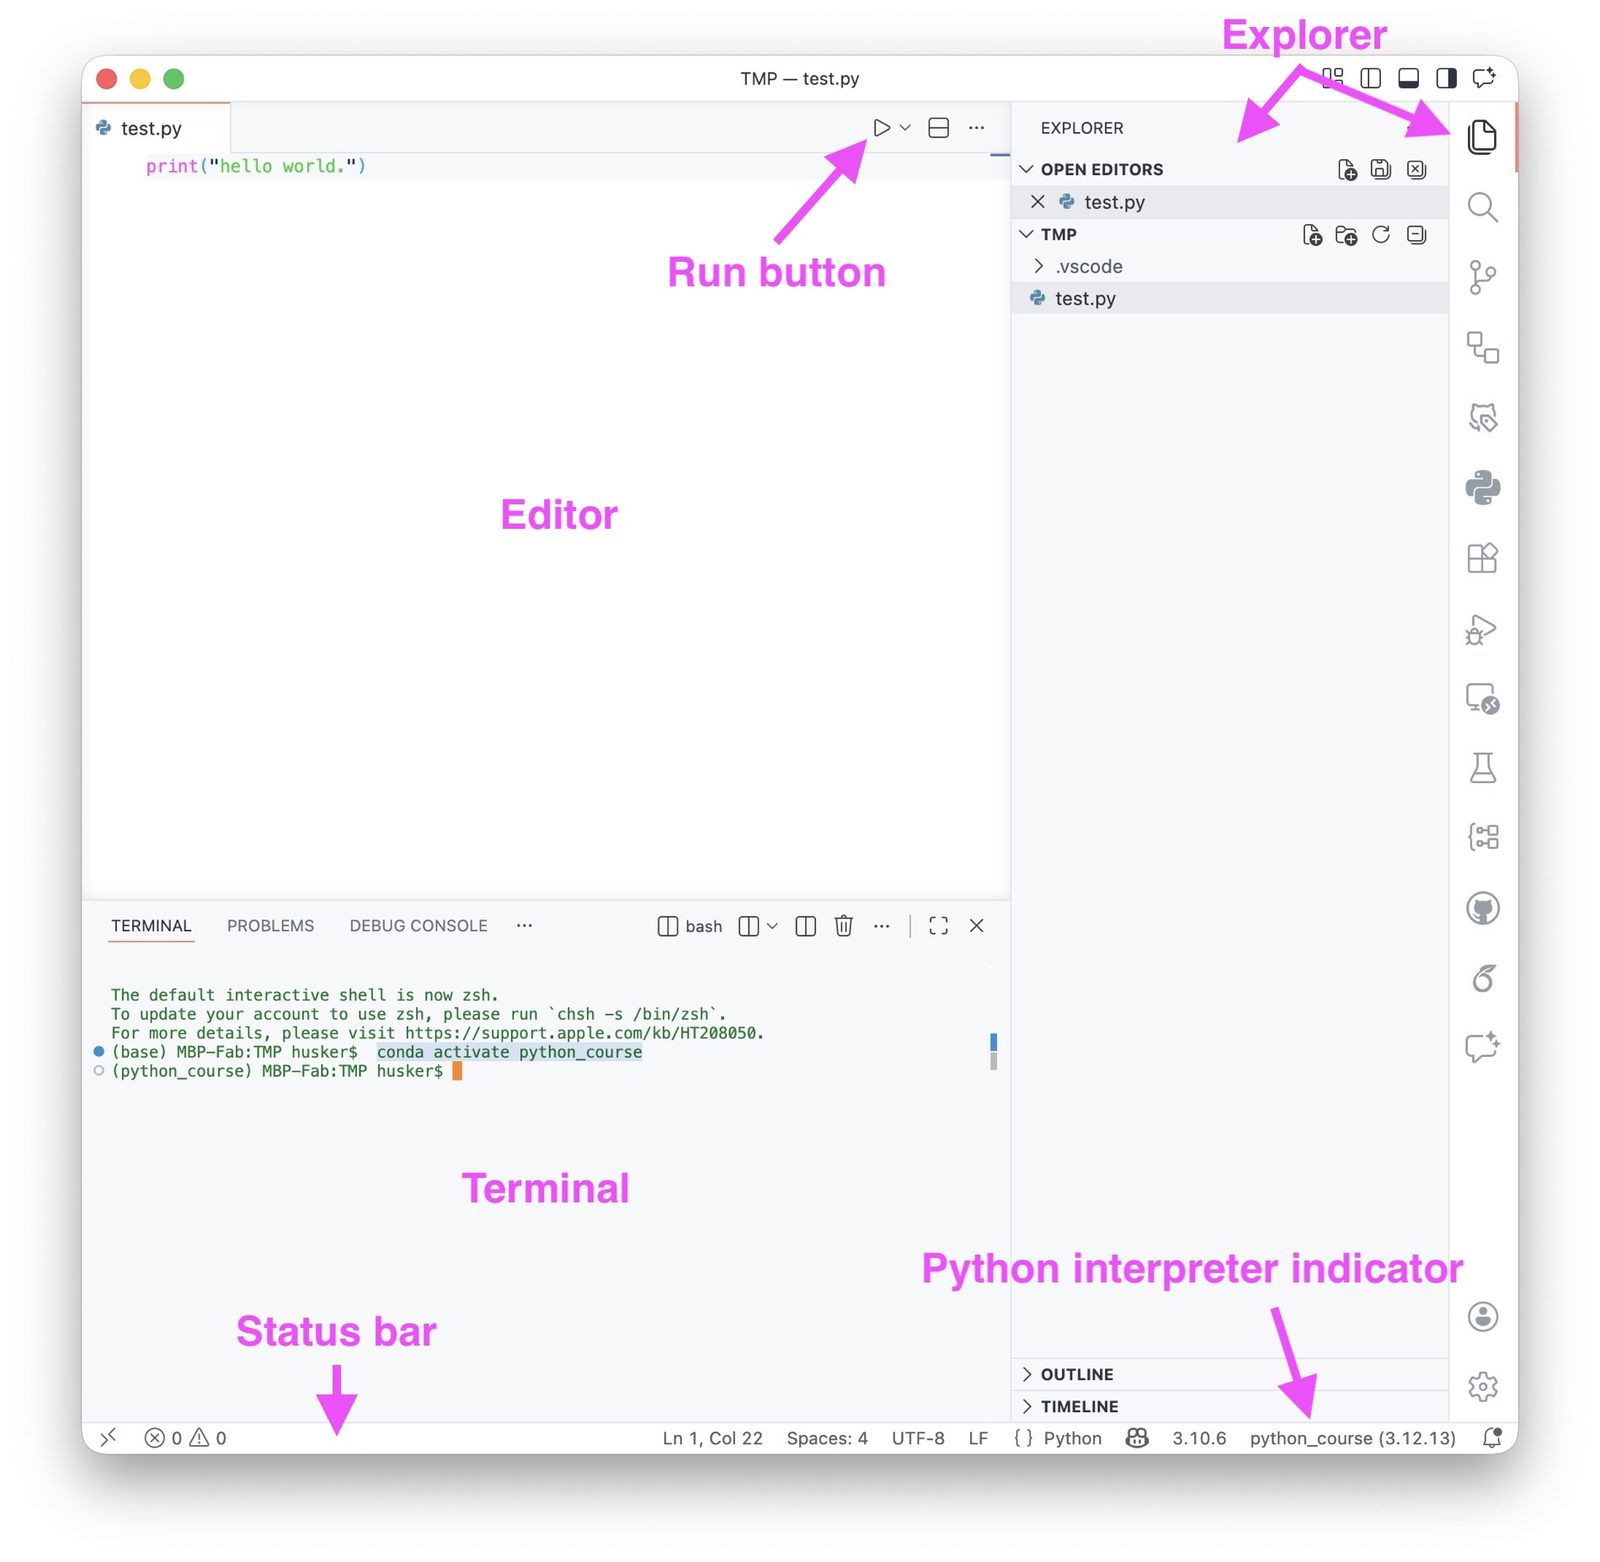
VS Code main window and its main modules (may differ depending on your setup).
The most important parts of the VS Code interface for this course are:
| Module | Description |
|---|---|
| Editor | Here you write your Python scripts or notebooks. A Python script is usually a text file with the ending .py. |
| Terminal | Here you can run Python, install packages, and execute scripts manually. |
| Interactive window / notebook output | When working with code cells or notebooks, this is where results can be displayed interactively. |
| Explorer | Lets you navigate through your files and folders, similar to Finder on macOS or Explorer on Windows. |
| Run button | Runs the current Python file. |
| Python interpreter indicator | Shows which Python installation or conda environment is currently active. |
| Extensions view | Lets you install and manage extensions such as Python and Jupyter. |
Python environments and package managers
Before we continue, we need to briefly clarify what a Python environment is and why we need one.
A Python environment is a self contained Python installation with its own Python version and its own set of installed packages. You can think of sandboxed environments that are separated from each other and from the default Python installation on your system. Each environment can have a different Python version and a different set of installed packages. This is useful because different projects may require different package versions, and these versions can otherwise conflict with each other.
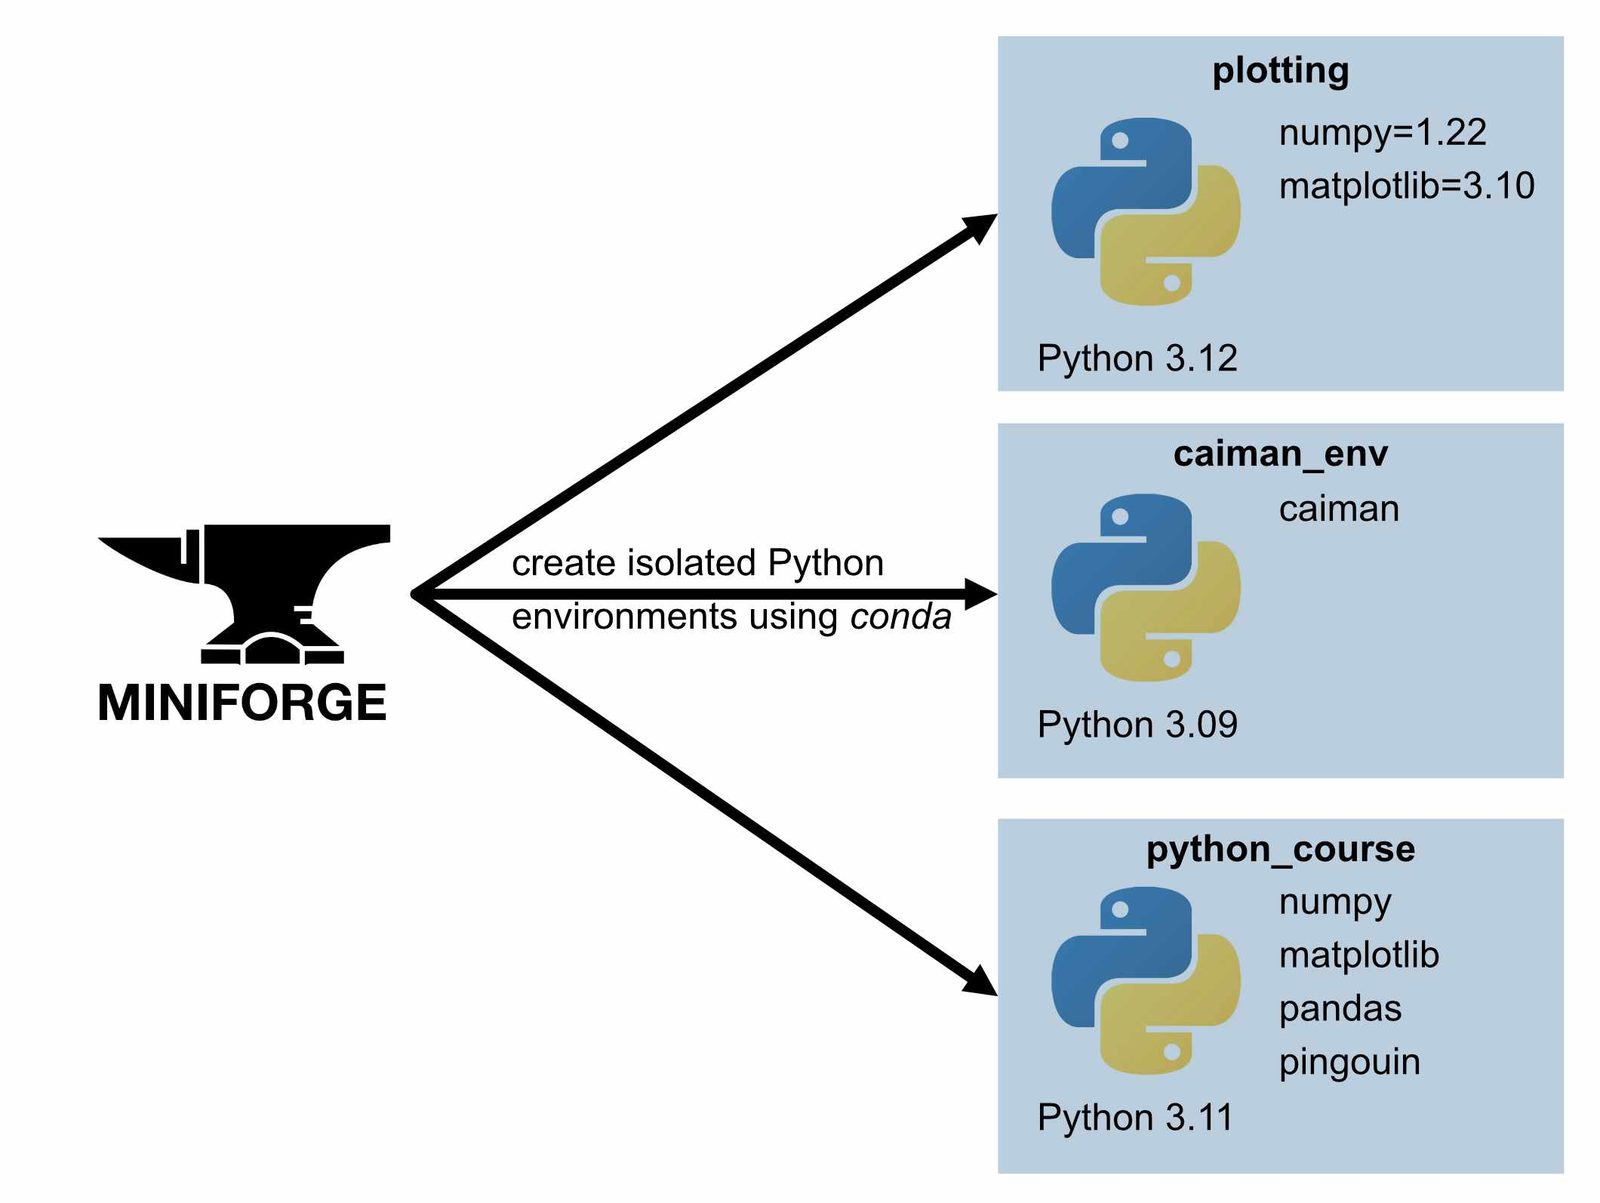
This diagram illustrates the basic idea of isolated Python environments created with conda via Miniforge. Starting from one Miniforge installation, you can create multiple separate environments, each with its own Python version and its own set of installed packages. This is useful because different projects may require different package versions or entirely different software stacks. For this course, we will create and use a dedicated environment called python_course, so that the packages needed here remain separated from other projects on your computer.
There are two common tools to install Python packages:
pipconda
The tool pip is the standard Python package installer. It downloads and installs packages from the Python Package Indexꜛ.
The tool conda is both a package manager and an environment manager. It can install Python itself, create isolated environments, and install packages into these environments. In this course, we will use conda, because it is convenient and makes it easier to manage Python and packages in a structured way.
Since you installed Miniforge, conda is already available on your system.
Creating and using a course environment
Instead of installing packages into the default Python installation (base), we will create a dedicated environment for this course.
Open a terminal, e.g., in VS Code or your system terminal, and run:
conda create -n python_course python=3.12 -y
This creates a new conda environment called python_course with Python 3.12 installed.
To activate the environment, run:
conda activate python_course
Once the environment is active, your terminal usually shows its name at the beginning of the command line, for example (python_course).
Troubleshooting on Windows machines
If you receive error messages on your Windows machine during installation, please check the troubleshooting section in the Miniforge blog post.
Troubleshooting: SSL and Certificate Issues
In some institutional environments network restrictions or SSL certificate settings may prevent conda from accessing package repositories correctly. Typical symptoms are SSL or certificate errors during installation. If this happens, first make sure that your conda configuration uses conda-forge consistently:
conda config --remove channels defaults
conda config --add channels conda-forge
conda config --set channel_priority strict
You can check your current channel configuration with:
conda config --show channels
In some cases, SSL verification itself may be the problem. As a temporary test, you can disable SSL verification:
conda config --set ssl_verify False
This is only a temporary workaround and is not recommended for regular use.
For more details and background, see the troubleshooting notes here in this blog post.
From now on, all packages that we install with conda will be installed into this environment.
To deactivate the environment, simply run:
conda deactivate
and to get an overview of all your environments, run:
conda env list
In case you want to remove an environment, you can run:
conda env remove -n python_course
To check whether all packages are installed correctly, you can run the following command in your terminal:
conda list
Installing additional packages
We will install some additional packages that we will need throughout the course.
With the environment activated, run:
mamba install -y matplotlib numpy pandas openpyxl xlrd pingouin ipykernel -c conda-forge
This installs the following packages:
matplotlibnumpypandasopenpyxlxlrdpingouinipykernel
The option -c conda-forge tells mamba to install the packages from the conda-forge channel, which we will use throughout the course. mamba is a faster alternative to conda for installing packages, but you can also use conda if you prefer. mamba comes with Miniforge, so you should have it available after installing Miniforge.
If you prefer, you can also install packages one by one.
Pip
All steps shown for conda above can also be done with pip, but conda is more convenient for managing environments and packages in a structured way. If you prefer to use pip, you need to have a Python installation on your system and create virtual environments with venv or virtualenv. For example, with venv:
python -m venv python_course
This creates a new virtual environment called python_course. To activate it, run:
source python_course/bin/activate  # on macOS/Linux
python_course\Scripts\activate     # on Windows
To deactivate the environment, simply run:
deactivate
To install packages with pip, run:
pip install matplotlib numpy pandas openpyxl xlrd pingouin ipykernel
The main differences between pip and conda are:
- pip only manages Python packages, while conda can manage both Python and non-Python packages.
- pip installs packages from PyPI, while conda installs packages from conda channels (e.g., conda-forge).
- conda can create isolated environments with different Python versions, while pip relies on virtual environments that share the same Python version as the system installation.
Selecting the Python interpreter in VS Code
To select the correct Python interpreter in VS Code, click on the Python version shown in the status bar at the bottom right of the window. This will open a list of available Python interpreters on your system. Look for the one that corresponds to your Miniforge installation or to the conda environment you created for this course (e.g., python_course), and select it.
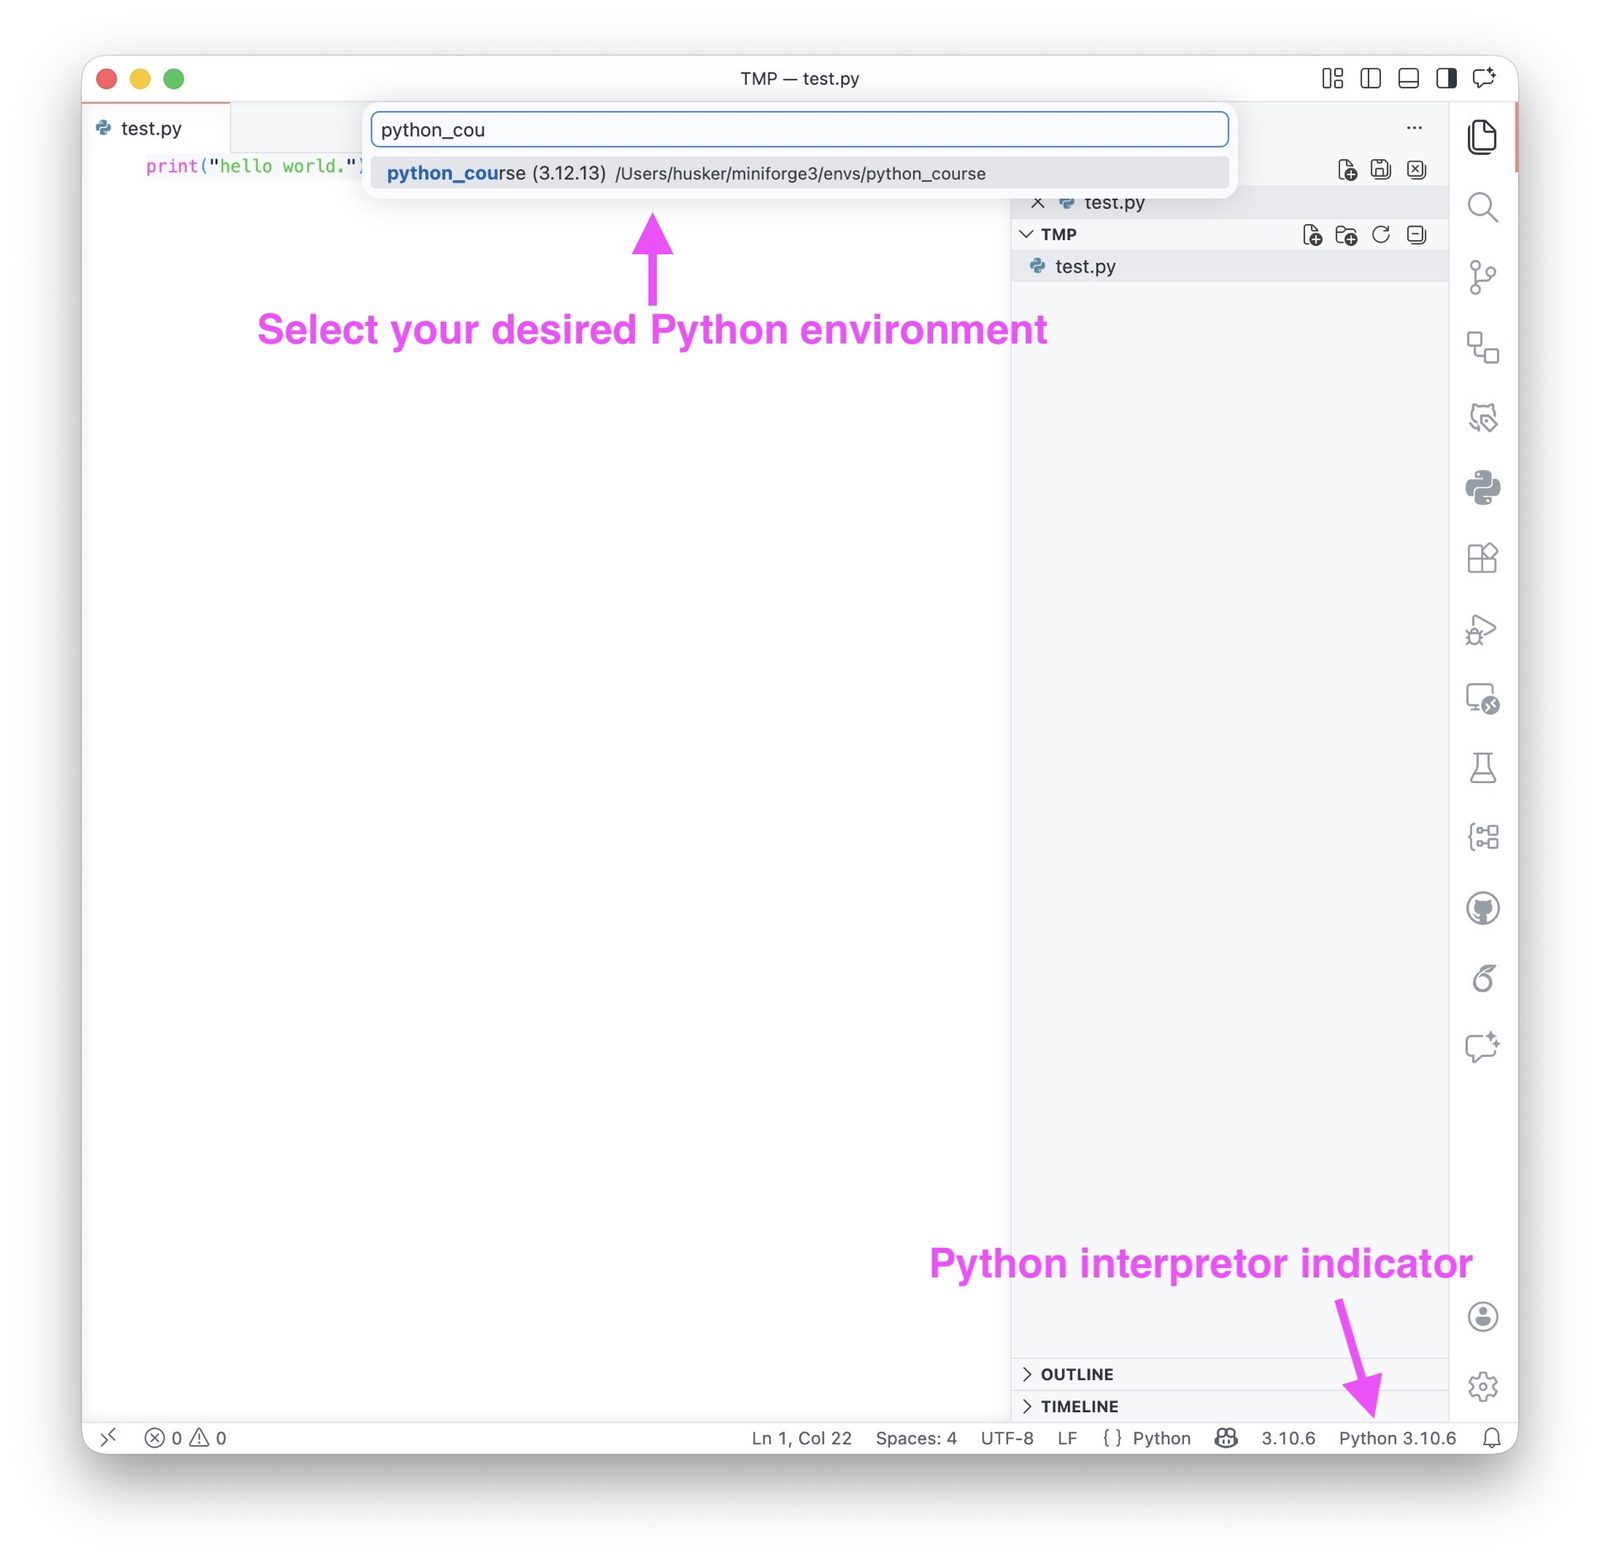
Selecting a Python interpreter in VS Code. In the status bar, click on the Python version to open the list of available interpreters. Then select the one that corresponds to your Miniforge installation or to the conda environment you created for this course (e.g., python_course).
Alternatively, you can also select the interpreter via the Command Palette:
- open the Command Palette via
Cmd+Shift+Pon macOS orCtrl+Shift+Pon Windows/Linux, - search for
Python: Select Interpreter, - choose the interpreter from your Miniforge installation or from the conda environment you want to use.
Once selected, the interpreter will be shown in the status bar, usually at the bottom right of the window.
Creating our first Python file
Create a new file in VS Code and save it as, for example, first_script.py.
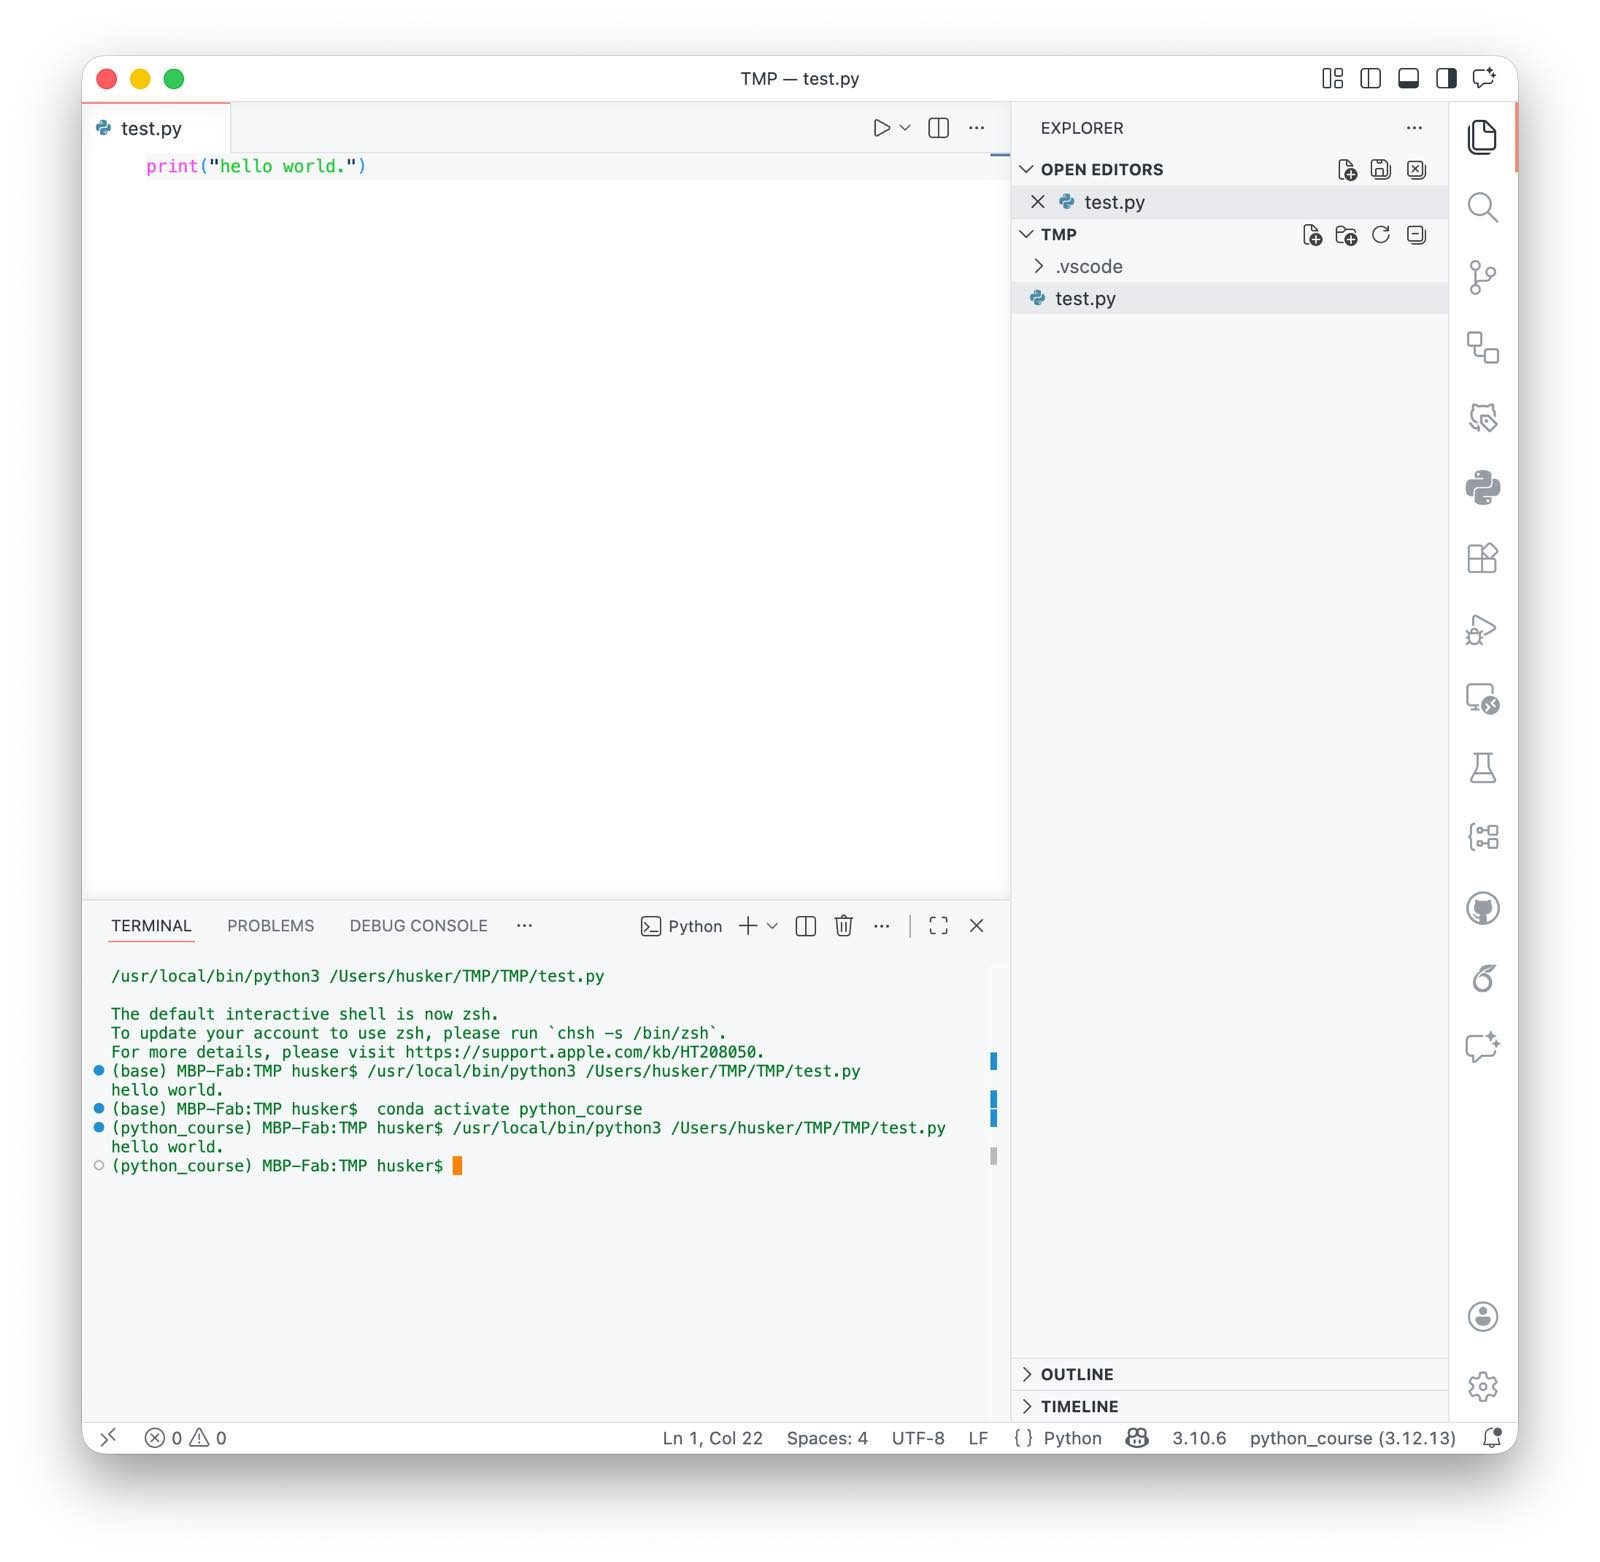
Example of a Python script in VS Code. In the Explorer, press the + button to create a new file, and save it with the ending .py. You can then write Python code into this file and run it. In this example, the script is run via the terminal. To run it, simply press the Run button. The output of the script is shown in the terminal. Note that the terminal also shows which conda environment is active (in this case, python_course).
You can now write Python code into this file.
The Python interactive terminal in VS Code
You can open the terminal in VS Code via:
Terminal→New Terminal
A terminal will open, usually at the bottom of the window. If your Miniforge environment is correctly configured, you can use it to run Python commands and install packages.
To start Python interactively, type:
python
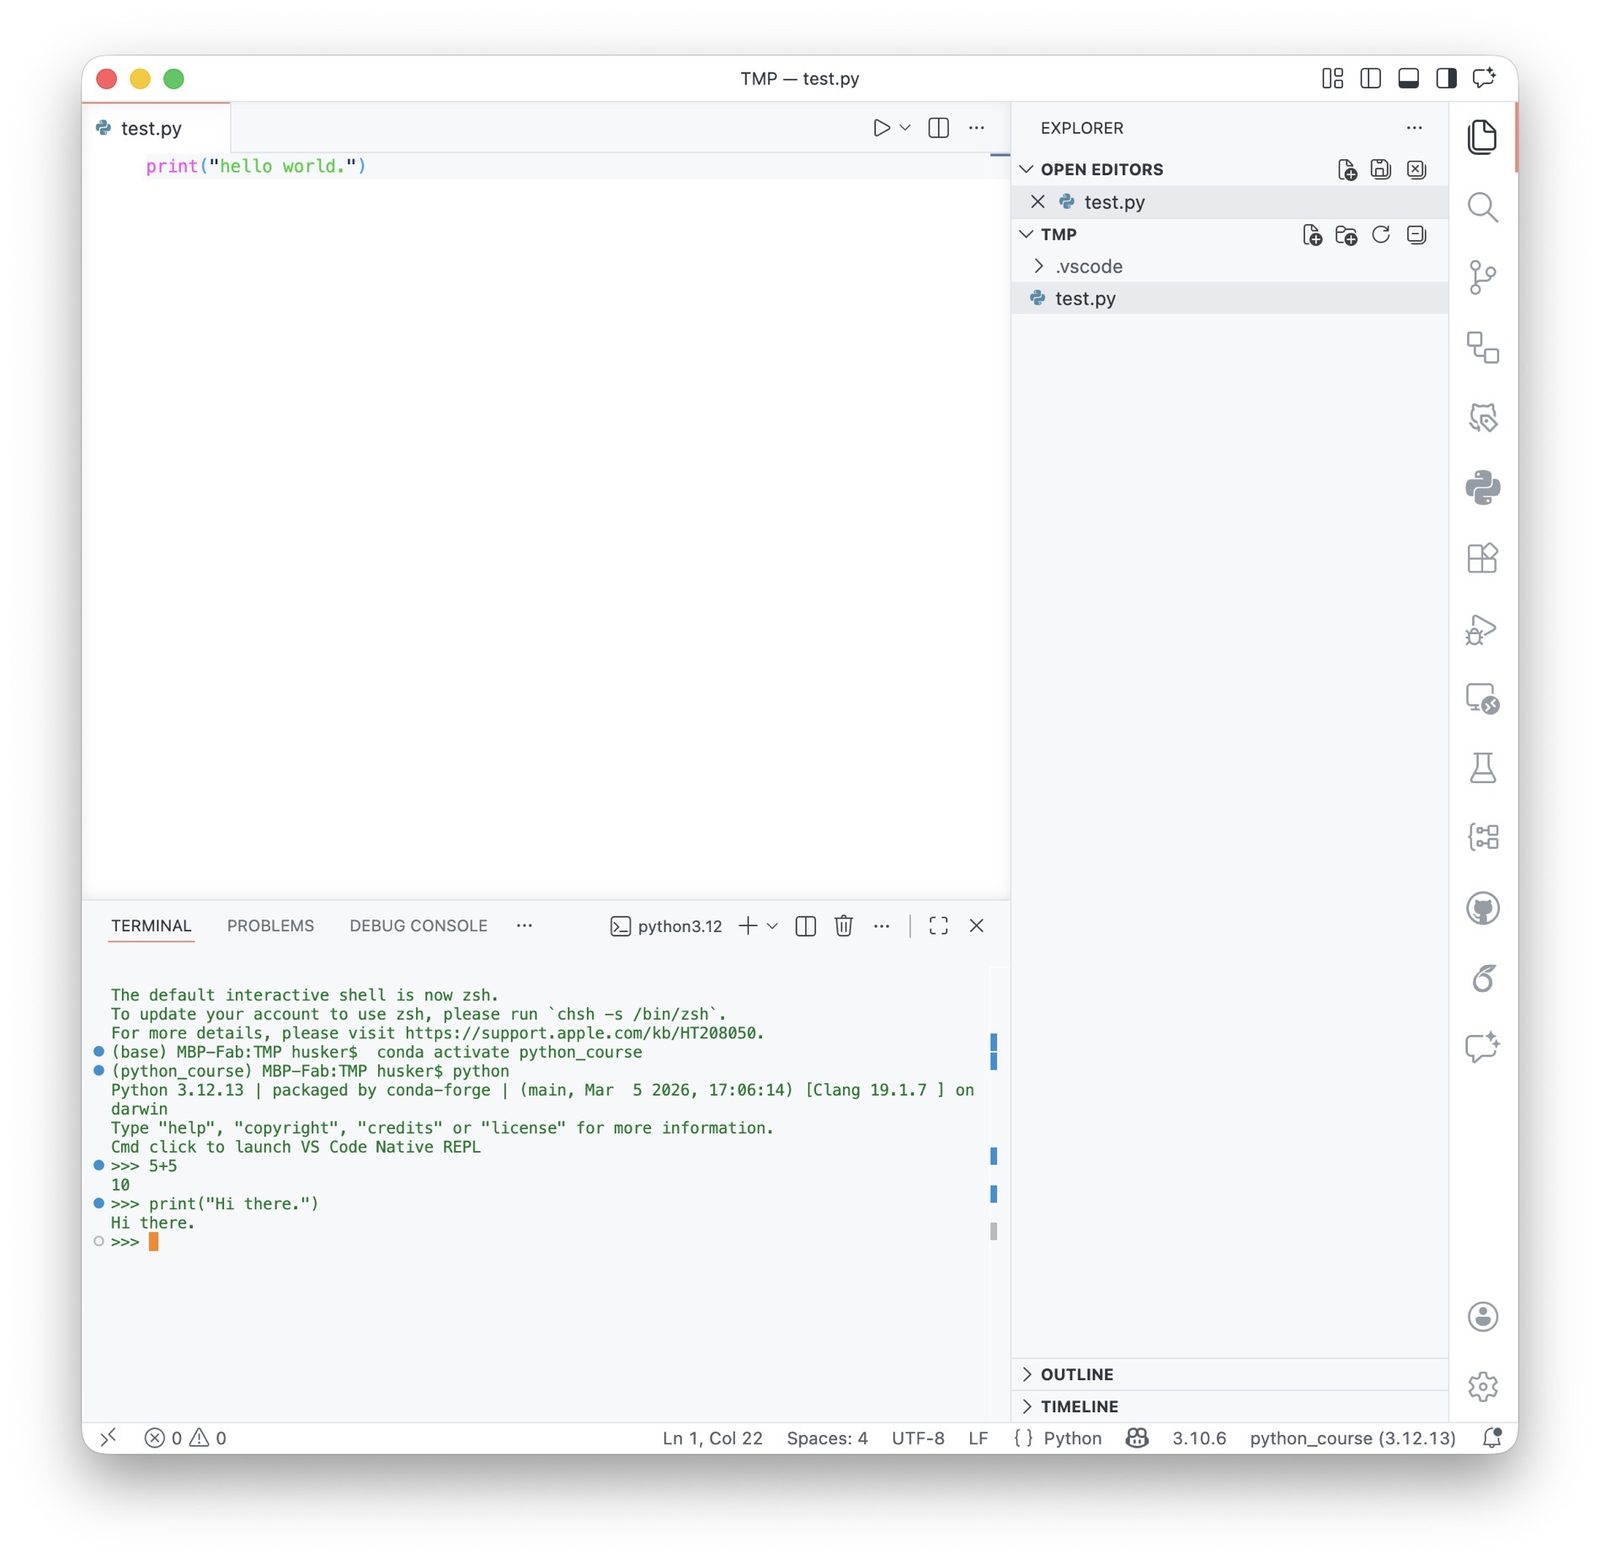
In this terminal example, we have already activated the python_course conda environment (as indicated by (python_course) at the beginning of the command line) and started Python interactively by typing python. The terminal then shows the Python version and a prompt (>>>) where you can type Python commands directly.
Our first commands
Type your first Python commands into the Python console:
5 + 5
print("Hello world.")
Now define your first variables:
a = 5
b = 10
print(a + b)          # this is the default print command
print(f"a+b={a+b}")   # this is a formatted print command
To leave the Python console again, type:
exit()
Running a Python script
Type the following code into your file first_script.py:
a = 5
b = 10
print(a + b)
print(b ** a)
Now run the script. You can do this in several ways:
- click the run button in the top right of the editor,
- right click right to the Run button and choose
Run Python File in Terminal, - execute it manually in the terminal with:
python first_script.py - right click right to the Run button and choose
Run File in Interactive Windowto run the script in the interactive window.
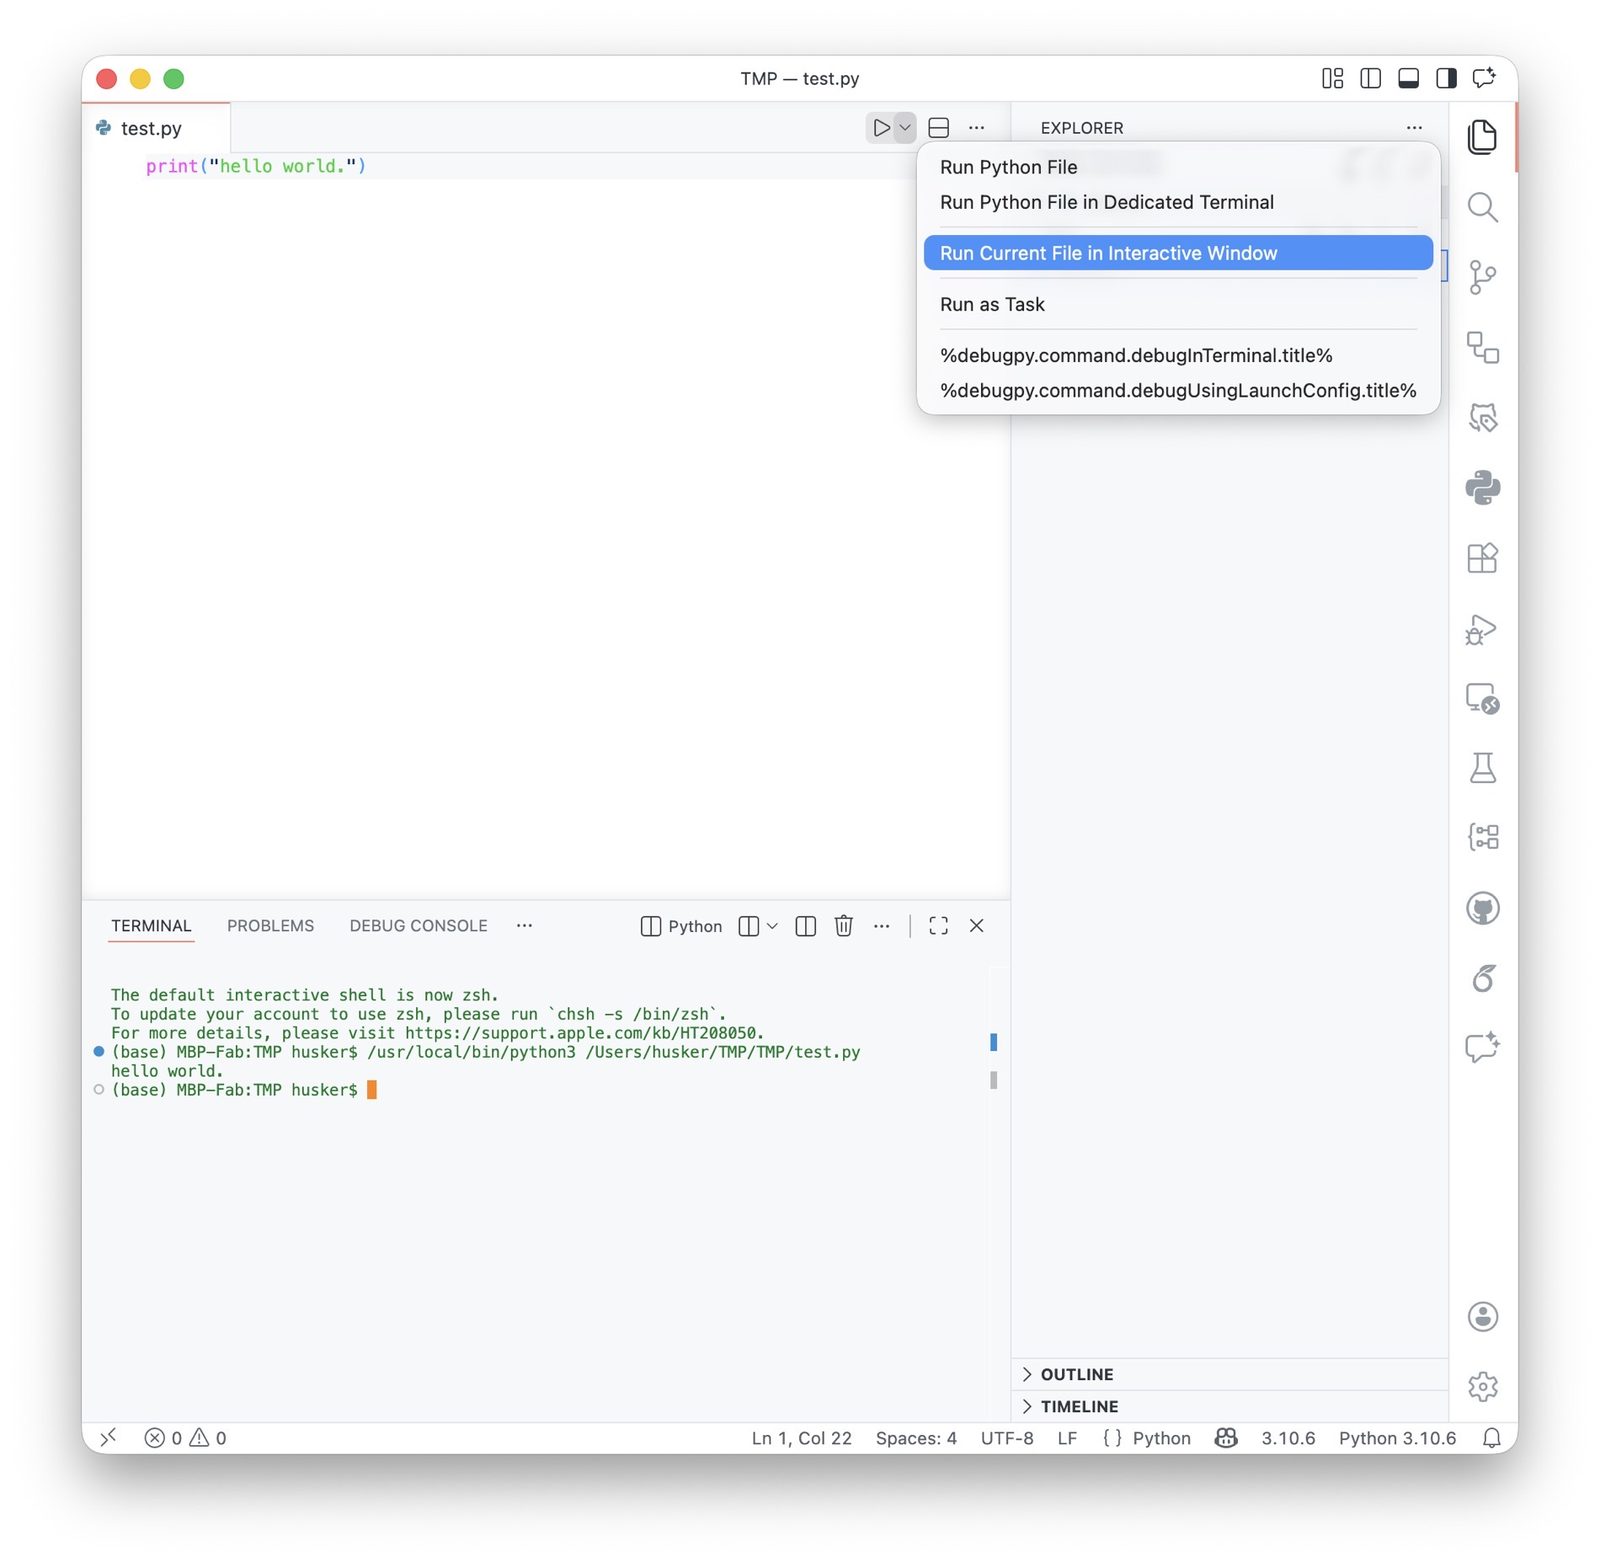
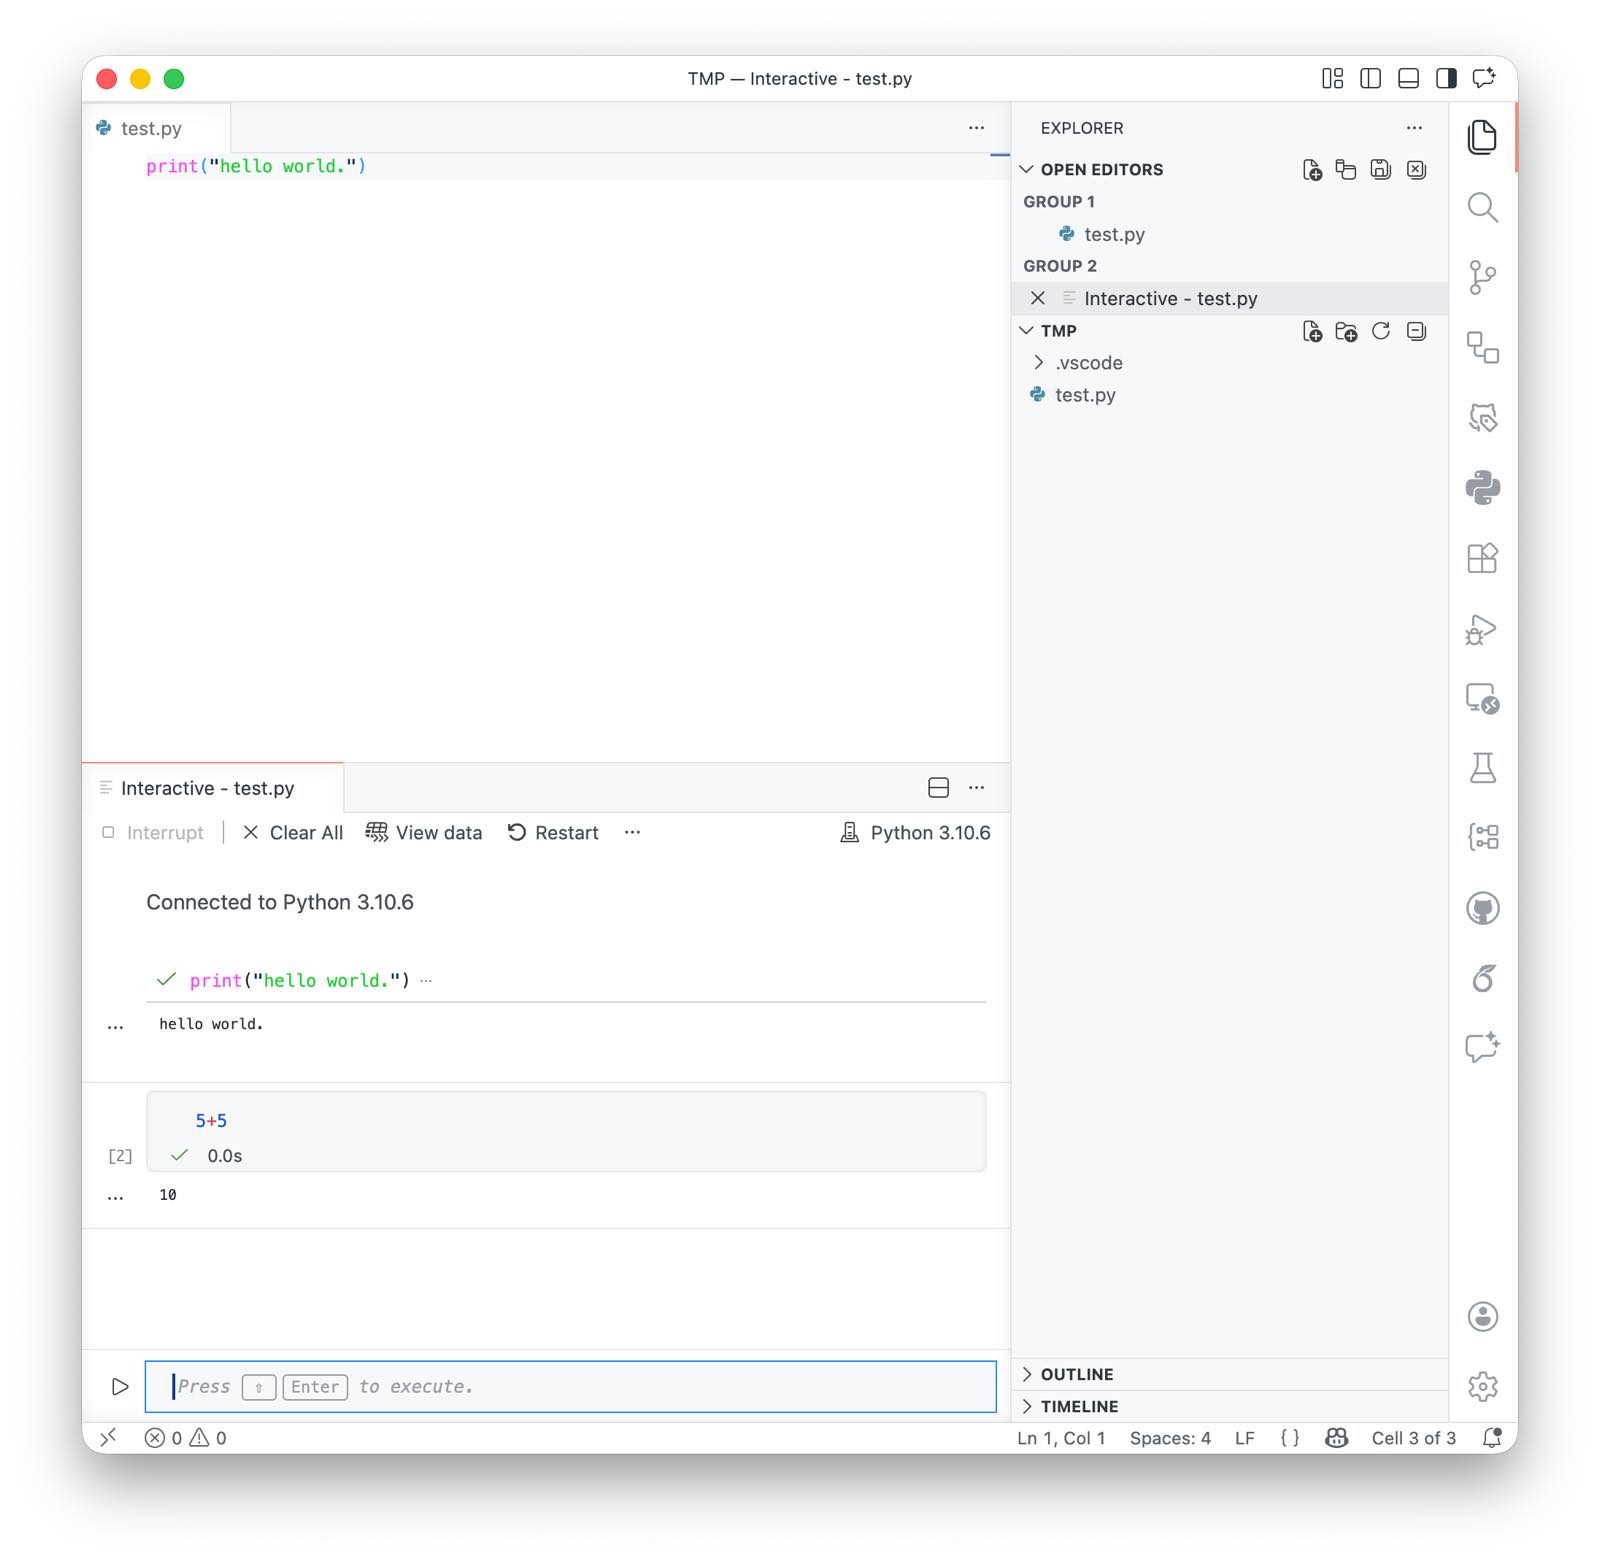
Choose how to run your Python script. In this example, the script is run in the interactive window (top). The output of the script is shown in the interactive window on the right as default (bottom). You can drag that window to a different location if you prefer. Note that the terminal also shows which conda environment is active (in this case, python_course).
Change b to 20 and run the script again:
b = 20
You will see that the output changes accordingly.
You can also define variables with text, so called strings:
text_A = "Hello, my name is "
text_B = "Gandalf."
print(text_A)
print(text_B)
print(text_A + text_B)
Comments
In Python, you have two options to add comments to your code:
- use
#followed by your comment text to add a line comment- can be placed anywhere in your script
- good for quick annotations
- every new line needs its own
#
# This is a line comment placed at the line beginning: print("Some text") # Line comments can be written one after another # and as many as you want to print("Some more text") # they can also be placed at the end of a line - use triple quotation marks such as
""" your block comment text """to add a block comment- this is also called a docstring when used, for example, inside functions or classes
- useful for longer comments because line breaks are possible inside the block
""" This is a block comment """

""" You can insert line breaks into a block comment,
which is useful for longer comments,
because you do not have to write # for each new line.
"""
General usage suggestions for comments: Where appropriate, use as many comments as useful. Comment your changes and add-ons to your code, explain your code to yourself and to colleagues, describe the units of the variables that you use, and note down to-dos or things that are not working yet. Your future self will thank you for that.
Code cells in VS Code
Besides comments, we can further structure our code by introducing code cells.
In VS Code, code cells in Python scripts are defined with # %% at the beginning of a line.
- use
# %%to introduce a new code cell, - the next
# %%starts another code cell, - after
# %%you can write a short title for the cell, - cells can be run individually in the interactive window.
# %% My first code cell
a = 5
b = 20
print(a + b)
print(b ** a)

# %% My second code cell
text_A = "Hello, my name is "
text_B = "Gandalf."
print(text_A)
print(text_B)
print(text_A + text_B)
When you move your cursor into a code cell, VS Code usually offers options such as Run Cell or Run Above. This sends the current cell to the interactive window and shows the result there.
General suggestions for code cells: You can use code cells to separate, for example, variable definitions, the main algorithm, and a plotting section from each other.
Jupyter notebooks in VS Code
During the course, we will also work with Jupyter notebooks.
A notebook file has the ending .ipynb and consists of cells that can contain either code or text. In VS Code, notebooks can be opened and edited directly if the Jupyter extension is installed.
We will explore Jupyter notebooks in more detail in the next chapter.
Summary
After these first steps, you should be able to:
- open VS Code,
- select your Python interpreter,
- open a terminal,
- start Python interactively,
- create and run a Python script,
- write comments, and
- structure your code into code cells.
From here on, we will use VS Code as our main working environment throughout the course.