Bio-image registration with Python
Which method works best for which registration problem? In this tutorial, we compare different methods for the registration of bio-images using Python.

What is image registration?
Image registration is the general problem of aligning two images, that are identical or at least very similar, but moved against each other. The goal of the registration is to find the correct transformation, that shifts one image in such a way, that both images do overlap as best as possible. Image registration is a common problem in many fields that deal with image analysis such as computer vision (e.g., in object tracking), satellite images (e.g., aligning multi-modal images from different cameras and from different angles), astrophotography (e.g., stacking images to increase the signal to noise ratio), medical imaging (e.g., aligning MRI or PET scans) and bio-images (e.g., aligning shaky images in in-vivo cell imaging). Image registration algorithms are available in common image analysis software like ImageJꜛ and for scientific programming languages like Python and Matlab.
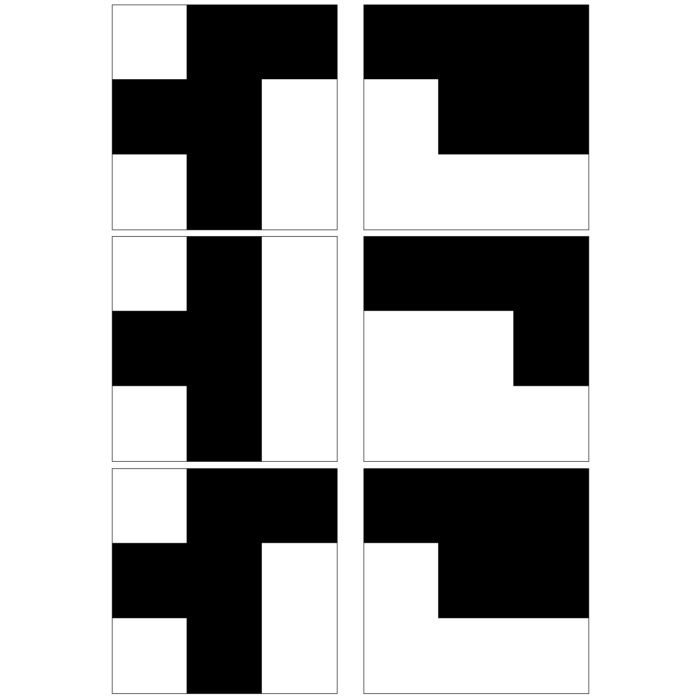
 Overlay of two identical images. One image is translated and rotated against the other one. The goal of image registration is to find a transformation, that shifts the moved image back to its original position.
The image, that is used as the stationary reference for the registration, is usually called target or template image $T$. The image, that is to be aligned, is usually called moved image $M$. Depending on the problem, one template image is used for the registration of one or a set of moved images. There are different types of transformations that describe, how $M$ is moved against $T$:
- translation
- Euclidean: translation and rotation
- similarity: translation, rotation and scaling
- affine: translation, rotation, scaling and shearing
- projective: translation, rotation, scaling, shearing and projective distortion
![]()
The registration methods can be classified as
- rigid registration: uses a simple transformation that is uniformly applied to the entire image, and
- non-rigid registration: allows a non-uniform mapping between the images; can correct small varying discrepancies and deformations of small spatial extent by deforming one image to match the other.
Rigid registration is useful, when $M$ is globally moved against $T$, e.g., due to a translation, rotation or scaling. Non-rigid methods are useful, when $M$ and $T$ are nearly identical except for some parts of $M$, that are moved or deformed, e.g., due to in-frame motion artifacts.
Registration methods are further classified as intensity-based and feature-based. Intensity-based methods compare the intensity patterns of $T$ and $M$ via correlation metrics, while feature-based methods compare distinct features in $T$ and $M$ such as points, lines, or contours. In bio-imaging like multi-photon microscopy, intensity-based methods are commonly used as they provide good performance for this imaging technique and usually do not require user-interaction. Intensity-based methods are typically based on either phase correlation or optical flow methods. The former is suitable for rigid and the latter for non-rigid registration (but not limited to it as we will learn throughout this tutorial).
Phase correlation methods
Let the difference between $T$ and $M$ be a translation that is described by $(u,v)$, i.e., $T(x,y) = M(x+u, y+v)$. According the shift theorem, the Fourier transforms $\mathcal{F}_T(\omega_x, \omega_y)$ and $\mathcal{F}_M(\omega_x, \omega_y)$ of $T$ and $M$ depend on each other as follows:
\[\mathcal{F}_M(\omega_x, \omega_y) = e^{-j(\omega_xu+\omega_yv)} \mathcal{F}_T(\omega_x, \omega_y)\]The Fourier transforms of $T$ and $M$ differ only by a phase shift $e^{-j(\omega_xu+\omega_yv)}$, that is directly related to the translation. This phase shift can be calculated via the normalized cross-power spectrum of both images:
\[e^{-j(\omega_xu+\omega_yv)} = \frac{\mathcal{F}_M(\omega_x, \omega_y) \mathcal{F}^*_T(\omega_x, \omega_y)}{ |\mathcal{F}_M(\omega_x, \omega_y) \mathcal{F}^*_T(\omega_x, \omega_y)| } := R\]$\mathcal{F}^*_T(\omega_x, \omega_y)$ is the complex conjugate of $\mathcal{F}_T(\omega_x, \omega_y)$. By applying the inverse Fourier transform of $R$ we obtain the normalized cross-correlation $r$:
\[r=\mathcal{F}^{-1}_R\]The location of the peak in $r$,
\[(\Delta x, \Delta y) = \underset{x,y}{\text{argmax}}(r)\]corresponds to the translational shift between $T$ and $M$. By translating $M$ by $(-\Delta x, -\Delta y)$ we can finally align both images on each other.
In practice, discrete Fourier transform (DFT) is carried out. While $(\Delta x, \Delta y)$ are discrete values due to the discrete nature of pixel numbers, sub-pixel precision can be achieved by repeating the previous steps, but applying an upsampled DFT around $(\Delta x, \Delta y)$, which serve as an initial guess.
The phase correlation method is resilient to noise, which is a common problem in in-vivo and other bio- and medical imaging techniques. Also the computation is quite fast as the fast Fourier transform (FFT) is used for calculating the cross-correlation. Besides translational shifts, the method can also be applied to determine rotation and scaling by converting the images to polar and log-polar coordinates, respectively. Both rotation and scaling can be determined independent of any existing translation due to properties of the Fourier transform.
The following Python code, adapted from scikit-image.orgꜛ, demonstrates the method:
import numpy as np
import matplotlib.pyplot as plt
from skimage import data
from skimage.transform import SimilarityTransform, warp

# create some toy data:
image = data.cells3d()[30,1,:,:]
shape = image.shape
plt.imshow(image)
shift_known = (-52, 23)
tform = SimilarityTransform(translation=(shift_known))
image_moved = warp(image, tform, preserve_range=True)
plt.imshow(image_moved)

# compute the cross-power spectrum of the two images:
image_product = np.fft.fft2(image) * np.fft.fft2(image_moved).conj()

# compute the (not-normalized) cross-correlation between
# the two images:
cc_image = np.fft.ifft2(image_product)

# for visualization reasons, shift the zero-frequency
# component to the center of the spectrum:
cc_image_fftshift = np.fft.fftshift(cc_image)
plt.imshow(cc_image_fftshift)

# find the peak in cc_image:
maxima = np.unravel_index(np.argmax(np.abs(cc_image)), shape)
midpoints = np.array([np.fix(axis_size / 2) for axis_size in shape])
float_dtype = image_product.real.dtype
shifts = np.stack(maxima).astype(float_dtype, copy=False)
shifts[shifts > midpoints] -= np.array(shape)[shifts > midpoints]
print(f"detected shifts: {shifts[1], shifts[0]} (known shift: {shift_known})")
detected shifts: (-30.0, 15.0) (known shift: (-30, 15))
 Demonstration of the phase correlation method. Shown are the plots generated by the Python code above. If $T$ and $M$ would be perfectly aligned, the peak in the cross-correlation $r$ would be in the center of the image. However, since both images are translated against each other, the peak is moved away from the center by $(\Delta x, \Delta y)$, which exactly corresponds to the actual translation.
Maybe you noticed that the cross correlation was not normalized in the Python code example above. The reason for this is that for noisy data, the method performs even better without the normalization, while for images under different illumination, better results are achieved by using the normalized cross correlation.
There are several implementations of the phase correlation method available for Python, e.g.:
phase_cross_crorr()ꜛ from the scikit-image packagepystackreg()ꜛ, a port of the ImageJ extension TurboReg/StackReg
I will use phase_cross_crorr() for the examples in this tutorial. This function receives an additional argument, upsample_factor, which defines the sub-pixel precision (if desired) by the fraction 1/upsample_factor of a pixel. The normalization can be controlled by setting the argument normalization to "phase" (the default) to apply the normalization, and to None for turning the normalization off.
# A default registration pipeline with phase_cross_corr():

from skimage.registration import phase_cross_correlation
from skimage.transform import SimilarityTransform, warp, rotate
import scipy as sp

template = ... # a given template image
moved    = ... # the moved image

# registration:
shift, _, _ = phase_cross_correlation(template, moved, upsample_factor=30,
                                      normalization="phase")
shifts=[shift[1], shift[0]]
print(f'Detected translational shift: {shifts}')
tform = SimilarityTransform(translation=(-shift[1], -shift[0]))
registered = warp(moved, tform, preserve_range=True)

# metrics:
pearson_corr_R     = sp.stats.pearsonr(template.flatten(), moved.flatten())[0]
pearson_corr_R_reg = sp.stats.pearsonr(template.flatten(), registered.flatten())[0]
print(f"Pearson correlation coefficient image vs. moved: {pearson_corr_R}")
print(f"Pearson correlation coefficient image vs. registration: {pearson_corr_R_reg}")
The example pipeline above accounts for translational shifts. To register rotational shifts, change the registration part to:
# registration:
radius_polar=800
template_polar = warp_polar(template, radius=radius_polar, preserve_range=True)
moved_polar = warp_polar(moved, radius=radius_polar, preserve_range=True)
shift_rot, _, _ = phase_cross_correlation(template_polar, moved_polar, upsample_factor=30,
                                          normalization="phase")
shift_rot = shift_rot[0]
print(f'Detected counterclockwise rotation: {shift_rot}°')
image_reg = rotate(moved, -shift_rot, preserve_range=True)
Optical flow methods
Optical flow or optic flow is the pattern of apparent motion of objects in a visual scene between two consecutive frames caused by the movement of the objects or the camera/observer. It can be considered as a 2D vector field, where each vector is a displacement vector of the points that have moved from one to the other frame. With the knowledge of the vector field one can estimate the directions of the movements and correct the image frame accordingly. Optical flow methods try to calculate these vector fields, usually by applying local Taylor series approximations of the image signal.
 Example of the optical flow method. The moved image $M$ is a translated version of the template image $T$. The according vector field overlaying $M$ indicates both the direction and the magnitude of the translation.
Let a pixel at location and time $(x,y,t)$ with intensity $I(x,y,t)$ be moved by $(\Delta x, \Delta y, \Delta t)$ from one image frame to another. We demand the following brightness constancy constraint:
\[I(x,y,t) = I(x+\Delta x, y+\Delta y, t+\Delta t)\]i.e., the brightness of the pixel before and after the movement is identical or at least quite similar. If we now assume, that the movement is small, we can develop $I(x,y,t)$ with Taylor series:
\[I(x+\Delta x, y+\Delta y, t+\Delta t) = I(x,y,t) +\] \[\qquad \frac{\partial I}{\partial x} \Delta x + \frac{\partial I}{\partial y} \Delta y + \frac{\partial I}{\partial t} \Delta t + \mathcal{O}\]The linearization of this equation (i.e., neglecting the higher order terms) gives:
\[\begin{align*} & \frac{\partial I}{\partial x} \Delta x + \frac{\partial I}{\partial y} \Delta y + \frac{\partial I}{\partial t} \Delta t =0 \\ \Leftrightarrow \;& \frac{\partial I}{\partial x} \frac{\Delta x}{\Delta t} + \frac{\partial I}{\partial y} \frac{\Delta y}{\Delta t} + \frac{\partial I}{\partial t} \frac{\Delta t}{\Delta t} =0 \\ \Leftrightarrow \;& \frac{\partial I}{\partial x} v_x + \frac{\partial I}{\partial y} v_y + \frac{\partial I}{\partial t} =0 \end{align*}\]where $v_x=\frac{\Delta x}{\Delta t}$ and $v_y=\frac{\Delta y}{\Delta t}$ are the $x$ and $y$ components of the velocity or optical flow of $I(x,y,t)$. With $\frac{\partial I}{\partial x}=I_x$, $\frac{\partial I}{\partial y}=I_y$ and $\frac{\partial I}{\partial t}=I_t$, the partial derivatives or gradients of the image at $(x,y,t)$ in the corresponding directions, the equation can be further expressed as
\[\begin{align*} \Leftrightarrow \;& I_x v_x + I_y v_y + I_t =0 \\ \Leftrightarrow \;& I_x v_x + I_y v_y = -I_t \\ \Leftrightarrow \;& \nabla I \cdot v = -I_t \end{align*}\]This equation, which is also referred to the optical flow equation, has two unknown ($v_x$, $v_y$) and cannot be solved as such. This is known as the aperture problem of optical flow algorithms. To find the optical flow, another set of equations is needed, given by some additional constraint. All optical flow methods introduce such additional conditions for estimating the actual flow. For instance, differential methods are based on the partial derivatives of the image signal and/or the sought flow field and higher-order partial derivatives. Common differential methods are for example the Lucas–Kanade method and the Gunner Farneback’s algorithm. The former computes the optical flow for a sparse feature set (sparse optical flow method), while the latter computes the optical flow for all points in the frame (dense optical flow method). From the approximations we have applied above we can see, that any optical flow method is only applicable in the presence of small scale changes both in motion and intensity.
For the examples in this tutorial I used the following differential optical flow Python methods:
optical_flow_ilk()ꜛ from the scikit-image package, an iterative Lucas-Kanade algorithm,optical_flow_tvl1()ꜛ also from the scikit-image package, an algorithm based on the total variation (TV) regularization with robust $L^1$ norm, andcalcOpticalFlowFarneback()ꜛ from the Open CV package, computes dense optical flow using the Farneback algorithm.
# A default pipeline with optical_flow_ilk():

from skimage.registration import optical_flow_ilk, optical_flow_tvl1
import cv2 as cv
from skimage.transform import warp
import scipy as sp
import numpy as np

template = ... # a given template image
moved    = ... # the moved image

# registration
v, u = optical_flow_ilk(template, moved, radius=10, prefilter=False,
                        num_warp=15, gaussian=True)
nr, nc = template.shape
row_coords, col_coords = np.meshgrid(np.arange(nr), np.arange(nc), indexing='ij')
registered= warp(moved, np.array([row_coords + v, col_coords + u]),
                 mode='constant', preserve_range=True)

pearson_corr_R     = sp.stats.pearsonr(template.flatten(), moved.flatten())[0]
pearson_corr_R_reg = sp.stats.pearsonr(template.flatten(), registered.flatten())[0]
print(f"Pearson correlation coefficient image vs. moved: {pearson_corr_R}")
print(f"Pearson correlation coefficient image vs. registration: {pearson_corr_R_reg}")
To apply the above pipeline with the optical_flow_tvl1() or the calcOpticalFlowFarneback() method, change the registration part to
v, u = optical_flow_tvl1(template, moved, attachment=100, tightness=1.20,
                          num_warp=15, num_iter=15, tol=0.1, prefilter=True)
nr, nc = template.shape
row_coords, col_coords = np.meshgrid(np.arange(nr), np.arange(nc), indexing='ij')
registered= warp(moved, np.array([row_coords + v, col_coords + u]),
                 mode='constant', preserve_range=True)
or
flow = cv.calcOpticalFlowFarneback(template, moved, size=median_filter_kernel),
                                   pyr_scale=0.6, levels=15, winsize=8, iterations=10,
                                   poly_n=7, poly_sigma=0, flags=0, flow=None)
nr, nc = flow.shape[:2]
flow_trans = flow.copy()
flow_trans[:,:,0] += np.arange(nc)
flow_trans[:,:,1] += np.arange(nr)[:,np.newaxis]
image_reg = cv.remap(image_shifted, flow_trans, None, cv.INTER_NEAREST)
respectively. The vector fields can be plotted via the following code:
import matplotlib.pyplot as plt

nvec = 20  # Number of vectors to be displayed along each image dimension
step = max(nr//nvec, nc//nvec)
y, x = np.mgrid[:nr:step, :nc:step]
u = -u[::step, ::step]
v = -v[::step, ::step]
plt.quiver(x, y, u_, v_, color='pink', units='dots', angles='xy',
           scale_units='xy', lw=3)

"""
For the Farneback algorithm, change x, y, u and v to:

u = -flow[::step, ::step, 0]
v = -flow[::step, ::step, 1]
x = np.arange(0, flow.shape[1], step)
y = np.arange(flow.shape[0], -1, -step)
"""
Benchmark test setup
To evaluate the performance of the Python registration functions mentioned above, I’ve created some test data covering the following transformations:
- global rigid translation: the test image is globally translated in $x$ and $y$ by -30 an 15 pixel, respectively.
- global rigid rotation: the test image is globally rotated by 5°.
- global rigid translation and rotation: the test image is both globally translated and rotated by the previously mentioned values.
- in-frame motion: one object (a cell) within the test image is translated.
- in-frame motion with a global intensity drop: same as for in-frame motion, but the entire image is dimmed by 40%.
- in-frame motion with a local intensity drop: same as for in-frame motion, but the moved cell (and only the cell) is dimmed by 50%.
- dichotomized sheared: the upper half of test image is translated into positive $x$-direction, the lower part into negative $x$-direction, and the split parts are additionally sheared.
The base for all test images is the “cells3dꜛ” image from the scikit-image package, a two-channel 3D fluorescence microscopy image of cells. I took slice #31 from the second channel, that contains the nuclei, and additionally added some extra noise. The following code generates all according images:
import numpy as np
from skimage import data
from skimage.transform import SimilarityTransform, warp, rotate, AffineTransform

image = data.cells3d()[30,1,:,:]
np.random.seed(1)
noise = np.random.normal(0, 0.2, image.shape)*image.mean()
image = image+noise

tform = SimilarityTransform(translation=(-30,15))
image_rigid_translated = warp(image, tform, preserve_range=True).astype(image.dtype)

image_rigid_rotated = rotate(image, angle=5, preserve_range=True)

image_rigid_translated_rotated = rotate(image_rigid_translated, angle=5, preserve_range=True)

image_moved_cell = data.cells3d()[30,1,:,:]
cell = image_moved_cell[130:180, 80:140].copy()
image_moved_cell[130:180, 80:140] = np.repeat(image_moved_cell[185:190, 80:140], 10, axis=0)
image_moved_cell[112:162, 73:133] = cell.copy()
image_moved_cell = image_moved_cell+noise

image_moved_cell_brightness_global = data.cells3d()[30,1,:,:]
cell = image_moved_cell_brightness_global[130:180, 80:140].copy()
image_moved_cell_brightness_global[130:180, 80:140] = np.repeat(image_moved_cell_brightness_global[185:190, 80:140], 10, axis=0)
image_moved_cell_brightness_global[112:162, 73:133] = cell.copy()
image_moved_cell_brightness_global = (image_moved_cell_brightness_global+noise)*0.60

image_moved_cell_brightness = data.cells3d()[30,1,:,:]
cell = image_moved_cell_brightness[130:180, 80:140].copy()*0.5
image_moved_cell_brightness[130:180, 80:140] = np.repeat(image_moved_cell_brightness[185:190, 80:140], 10, axis=0)
image_moved_cell_brightness[112:162, 73:133] = cell.copy()
image_moved_cell_brightness = image_moved_cell_brightness+noise

image_dichotomized_sheared = np.zeros((image.shape), dtype=image.dtype)
tform = AffineTransform(shear=np.pi/35)
image_dichotomized_sheared[:128,30:] = warp(image[:128,0:-30], tform, preserve_range=True)
image_dichotomized_sheared[128:,:-30]= warp(image[128:,30:], tform.inverse, preserve_range=True)
 Test images for assessing the Python registration functions. All images are based on the “cells3dꜛ” image from the scikit-image package, a 3D fluorescence microscopy image of cells. As test image, slice #31 of the second channel (nuclei) was taken.
To asses the performance of each registration method, I calculated the Pearson correlation coefficient between the template image and the moved image before and after the registration. The correlation coefficient accounts for an area 30 pixels apart from the image borders (indicated by a red rectangle in the figures) as the applied transformations move a certain amount of the image from the field of view. In some cases, an additional median-filter was applied on both the template and the moved image in order to increase the performance of the registration. The applied parameters for each registration are listed in the captions of the figures shown below. The entire code used to generate the plots in this tutorial is available in this GitHub repositoryꜛ.
Global Euclidean transformations
Phase cross-correlation method
As expected, the phase cross-correlation method has no problems to detect the translation of (-30, 15):
![]() Phase correlation: Registration of global rigid translation with
Phase correlation: Registration of global rigid translation with phase_cross_corr(), applied with upsample_factor=30.
Also the rotation of 5° is precisely detected:
`, applied with `upsample_factor=30`.") Phase correlation: Registration of global rigid rotation with
Phase correlation: Registration of global rigid rotation with phase_cross_corr(), applied with upsample_factor=30.
However, the performance for the translated and rotated transformation is rather weak. Neither the rotation of 5° nor the translation of (-30, 15) are correctly detected:
![]() Phase correlation: Registration of global rigid translation and rotation with
Phase correlation: Registration of global rigid translation and rotation with phase_cross_corr(), applied with upsample_factor=30.
I tried different median-filters and also run the phase_cross_corr() without normalization, which didn’t improve the result. I also changed the order between the detection of the rotation and the translation, which actually should have no effect on the result. However, switching the order further worsened the result. Only by reducing the translation to (-10, 5), disabling the normalization and by applying a median-filter with a huge kernel size of 17, I was able to obtain a decent result:
![]() Phase correlation: Registration of global rigid translation and rotation (less translated) with
Phase correlation: Registration of global rigid translation and rotation (less translated) with phase_cross_corr(), applied with upsample_factor=30, normalization=None and a median-filter with a kernel size of 17.
Summary
The phase correlation method is the best choice for registering global rigid translations and rotations. However, one should always cross-check whether the results of the registration are reasonable or not, and adjust the application of phase_cross_corr() accordingly, e.g., by turning off the normalization or by pre-applying a median-filter. In some cases it can also be useful to define a maximum translational and rotational shift, if you expect no large shifts in the underlying problem. Those frames, for which the registration reaches this maximum, could be classified as “corrupted” (regarding the registration) and could be marked for further investigation. Or, having enough frames available, e.g., in a large time-lapse stack, these frames could be dropped from the image stack entirely.
Optical flow methods
Even though they are not meant to be for global Euclidean transformations, I applied all optical flow methods on this problem as well.
Translation
Surprisingly, all optical flow methods lead to very good results in detecting the translational shift, with the Lukas-Kanade algorithm showing the best performance among all optical methods, which even lies in the range of phase cross-correlation method. Only the total variation regularization method (TV) performs a bit weaker than the other two. Also, both the TV and the Farneback method show some glitch in the two border regions, where the moved image has been shifted (right and bottom border). To overcome this glitch, that consist of a smearing of the cells’ shape, one could crop the registered image accordingly, which, however, would require a fixed cut-off value (for an automatic approach) or additional user interaction (for a manual approach).
![]() Lukas-Kanade: Registration of global rigid translation with
Lukas-Kanade: Registration of global rigid translation with optical_flow_ilk(), applied with radius=30, prefilter=False, num_warp=10, and gaussian=False.
![]() TV: Registration of global rigid translation with
TV: Registration of global rigid translation with optical_flow_tvl1(), applied with attachment=60, tightness=0.99, num_warp=15, num_iter=15, tol=0.0001, and prefilter=False.
![]() Farneback: Registration of global rigid translation with
Farneback: Registration of global rigid translation with calcOpticalFlowFarneback(), applied with pyr_scale=0.5, levels=15, winsize=7, iterations=10, poly_n=5,poly_sigma=10, flags=0, and flow=None.
Rotation
Also the rotational transformation is perfectly corrected by the optical flow methods, where the Lukas-Kanade and the Farneback algorithm show the highest registration performance. The TV algorithm introduces some glitch within the registered image, consisting of small wholes in the nuclei. Again, both the TV and the Farneback method also introduce some glitch in the border regions.
`") Lukas-Kanade: Registration of global rigid rotation with
Lukas-Kanade: Registration of global rigid rotation with optical_flow_ilk(), applied with radius=30, prefilter=False, num_warp=10, and gaussian=False.
`") TV: Registration of global rigid rotation with
TV: Registration of global rigid rotation with optical_flow_tvl1(), applied with attachment=60, tightness=0.99, num_warp=15, num_iter=15, tol=0.0001, prefilter=False, and a median-filter with a kernel size of 3.
`") Farneback: Registration of global rigid rotation with
Farneback: Registration of global rigid rotation with calcOpticalFlowFarneback(), applied with pyr_scale=0.5, levels=15, winsize=7, iterations=10, poly_n=5,poly_sigma=10, flags=0, and flow=None.
Translation and rotation
Unlike the phase cross-correlation method, the optical flow methods register the translational and rotational transformation with ease. Only the TV algorithm shows poor performance.
![]() Lukas-Kanade: Registration of global rigid translation and rotation with
Lukas-Kanade: Registration of global rigid translation and rotation with optical_flow_ilk(), applied with radius=30, prefilter=False, num_warp=10, and gaussian=False.
![]() TV: Registration of global rigid translation and rotation with
TV: Registration of global rigid translation and rotation with optical_flow_tvl1(), applied with attachment=60, tightness=0.99, num_warp=15, num_iter=15, tol=0.0001, and prefilter=False.
![]() Farneback: Registration of global rigid translation and rotation with
Farneback: Registration of global rigid translation and rotation with calcOpticalFlowFarneback(), applied with pyr_scale=0.5, levels=15, winsize=7, iterations=10, poly_n=5,poly_sigma=10, flags=0, and flow=None.
Summary
All optical flow methods perform very well for global Euclidean transformations. Among all three optical flow methods, the Lukas-Kanade algorithm performs best, which may be due to its sparse optical flow nature, that enables a better detection of global shifts. The TV and Farneback algorithm also perform very well, but introduce glitch in the border regions. The TV algorithm produces in some cases even some glitch in the image center and performs worse among all tested optical flow methods.
Despite the good performance of the optical flow methods with regard to global rigid transformations, two aspects should be considered if you plan to use these methods for this type of registration. First, all optical flow methods are computational costly, as they all include the calculation of the gradient of the entire image. The phase correctional method is computational faster due to the applied FFT. One should therefore consider to prefer the latter over optical flow methods, if the same registration results can achieved with both methods. Second, optical flow methods detect in-frame motion, for which they are sensitive for. In the examples above, both the template and the moved image were identical and just translated and rotated against each other. In case both images are morphologically similar but not identical and the goal is a global rigid registration, optical flow methods additionally correct also slight in-frame variations, which is something you may not want. For instance, in the example below, I registered the given template to another frame of the same image stack (frame #46). Both frames are actually perfectly aligned, they are just taken from different depths from the 3D volume, only the sizes of the nuclei vary a bit. I applied no additional transformations and therefore no transformation should be detected on a global scale. However, the Lukas-Kanade method detects in-frame motion in the upper right and left corner as well as in the lower right corner, while the phase cross-correlation method detects no shifts at all.
![]() Lukas-Kanade: Registration of two similar, non-translated images with
Lukas-Kanade: Registration of two similar, non-translated images with optical_flow_ilk(), applied with radius=30, prefilter=False, num_warp=10, and gaussian=False.
![]() Phase correlation: Registration of two similar, non-translated images with
Phase correlation: Registration of two similar, non-translated images with phase_cross_corr(), applied with upsample_factor=30.
In-frame movement
All optical flow methods have no problem to detect the moved cell within the image frame and the registration performance is equally decent:
`") Lukas-Kanade: Registration of in-frame motion with
Lukas-Kanade: Registration of in-frame motion with optical_flow_ilk(), applied with radius=10, prefilter=False, num_warp=15, and gaussian=True.
`") TV: Registration of in-frame motion with
TV: Registration of in-frame motion with optical_flow_tvl1(), applied with attachment=100, tightness=1.20, num_warp=15, num_iter=15, tol=0.1, and prefilter=True.
`") Farneback: Registration of in-frame motion with
Farneback: Registration of in-frame motion with calcOpticalFlowFarneback(), applied with pyr_scale=0.6, levels=15, winsize=8, iterations=10, poly_n=7,poly_sigma=0, flags=0, and flow=None.
Global illumination variation
Since all optical flow methods performed well in detecting the moved cell, let’s see what happens if we violate the brightness constancy constraint. To do so, I applied a global brightness drop of 40% to the moved image. Both the Lukas-Kanade and the Farneback algorithm are still able to correctly detect the moved cell, but the overall registration performance has decreased from a Pearson correlation coefficient of 0.99 to 0.92, since some additional, but actually non-present, in-frame motion is detected (compare the vector fields of both methods with those from the previous example). The TV algorithm fails completely and introduces global glitch, i.e., morphological deformation in the entire image frame.
`") Lukas-Kanade: Registration of in-frame motion including a global brightness drop with
Lukas-Kanade: Registration of in-frame motion including a global brightness drop with optical_flow_ilk(), applied with radius=10, prefilter=False, num_warp=15, and gaussian=True.
`") TV: Registration of in-frame motion including a global brightness drop with
TV: Registration of in-frame motion including a global brightness drop with optical_flow_tvl1(), applied with attachment=100, tightness=1.20, num_warp=15, num_iter=15, tol=0.1, and prefilter=True.
`") Farneback: Registration of in-frame motion including a global brightness drop with
Farneback: Registration of in-frame motion including a global brightness drop with calcOpticalFlowFarneback(), applied with pyr_scale=0.6, levels=15, winsize=8, iterations=10, poly_n=7,poly_sigma=0, flags=0, and flow=None.
In case of brightness variations, a technique called histogram matchingꜛ can often be helpful to match the global brightness of the template and the moved image. I used the match_histograms()ꜛ function from the scikit-image package in order apply such matching. And indeed, not only does the performance of the Lukas-Kanade and the Farneback algorithm improve, but also the TV algorithm is now able to register the image correctly:
`") Lukas-Kanade: Registration of in-frame motion including a global brightness drop and histogram matching with
Lukas-Kanade: Registration of in-frame motion including a global brightness drop and histogram matching with optical_flow_ilk(), applied with radius=10, prefilter=False, num_warp=15, and gaussian=True.
`") TV: Registration of in-frame motion including a global brightness drop and histogram matching with
TV: Registration of in-frame motion including a global brightness drop and histogram matching with optical_flow_tvl1(), applied with attachment=100, tightness=1.20, num_warp=15, num_iter=15, tol=0.1, and prefilter=True.
`") Farneback: Registration of in-frame motion including a global brightness drop and histogram matching with
Farneback: Registration of in-frame motion including a global brightness drop and histogram matching with calcOpticalFlowFarneback(), applied with pyr_scale=0.6, levels=15, winsize=8, iterations=10, poly_n=7,poly_sigma=0, flags=0, and flow=None.
Local illumination variation
But how do optical flow methods perform, if the brightness variations are locally constrained? To test this, I reduced the brightness of the moved cell by 50 % and kept the rest of the image untouched. Now all methods perform badly except for the Farneback algorithm, which is still able to register the cell correctly, but causes a slight deformation of the cell’s shape:
`") Lukas-Kanade: Registration of in-frame motion including a local brightness drop with
Lukas-Kanade: Registration of in-frame motion including a local brightness drop with optical_flow_ilk(), applied with radius=10, prefilter=False, num_warp=15, and gaussian=True.
`") TV: Registration of in-frame motion including a local brightness drop with
TV: Registration of in-frame motion including a local brightness drop with optical_flow_tvl1(), applied with attachment=100, tightness=1.20, num_warp=15, num_iter=15, tol=0.1, and prefilter=True.
`") Farneback: Registration of in-frame motion including a local brightness drop with
Farneback: Registration of in-frame motion including a local brightness drop with calcOpticalFlowFarneback(), applied with pyr_scale=0.6, levels=15, winsize=8, iterations=10, poly_n=7,poly_sigma=0, flags=0, and flow=None.
This time, applying the histogram matching technique doesn’t help and the performance of the registration remains bad:
`") Lukas-Kanade: Registration of in-frame motion including a local brightness drop and histogram matching with
Lukas-Kanade: Registration of in-frame motion including a local brightness drop and histogram matching with optical_flow_ilk(), applied with radius=10, prefilter=False, num_warp=15, and gaussian=True.
`") TV: Registration of in-frame motion including a local brightness drop and histogram matching with
TV: Registration of in-frame motion including a local brightness drop and histogram matching with optical_flow_tvl1(), applied with attachment=100, tightness=1.20, num_warp=15, num_iter=15, tol=0.1, and prefilter=True.
`") Farneback: Registration of in-frame motion including a local brightness drop and histogram matching with
Farneback: Registration of in-frame motion including a local brightness drop and histogram matching with calcOpticalFlowFarneback(), applied with pyr_scale=0.6, levels=15, winsize=8, iterations=10, poly_n=7,poly_sigma=0, flags=0, and flow=None.
The reason for this result is not surprising. The applied histogram matching method acts on the entire image, for which the cumulative histogram is calculated. The local brightness drop doesn’t affect the overall cumulative brightness distribution that much. And even if the cumulative brightness distribution would be adjusted for the local brightness variation patch, the according brightness adjustments would act on the entire image, which also includes the correctly illuminated image parts outside the patch. A workaround for this problem could for example be an adaptive or patch-wise histogram matching approach.
Extreme deformations
At the end, let’s apply the optical flow methods to a heavy image transformation. For this test, I split the test image into an upper and lower half. I translated the former into positive $x$-direction and the latter into negative $x$-direction. Additionally, I sheared the two split image parts. This time, none of the optical flow methods is able to register the moved image correctly. This accounts for both, comparing the Person correlation coefficients as well as visually inspecting the registration results. No method can either detect the dichotomous split or the shearing correctly. Additionally, all methods introduce glitch either in the border regions or in the image center:
`") Lukas-Kanade: Registration of a dichotomously translated and sheared image with
Lukas-Kanade: Registration of a dichotomously translated and sheared image with optical_flow_ilk(), applied with radius=10, prefilter=False, num_warp=15, and gaussian=True.
`") TV: Registration of a dichotomously translated and sheared image with
TV: Registration of a dichotomously translated and sheared image with optical_flow_tvl1(), applied with attachment=100, tightness=1.20, num_warp=15, num_iter=15, tol=0.1, and prefilter=True.
`") Farneback: Registration of a dichotomously translated and sheared image with
Farneback: Registration of a dichotomously translated and sheared image with calcOpticalFlowFarneback(), applied with pyr_scale=0.6, levels=15, winsize=8, iterations=10, poly_n=7,poly_sigma=0, flags=0, and flow=None.
An improvement of the registration with the TV algorithm can be achieved by pre-applying a median-filter with a kernel size of 3. However, the cells in the border region are still not well detected and remain deformed:
`") TV: Registration of a dichotomously translated and sheared image with
TV: Registration of a dichotomously translated and sheared image with optical_flow_tvl1(), applied with attachment=100, tightness=1.20, num_warp=15, num_iter=15, tol=0.1, prefilter=True and a median-filter with a kernel size of 3.
A further workaround could be a split registration, where we first register the upper half of the moved image to the upper half of the template image, and then repeat the same for the lower half. This method, however, requires knowledge about the location of the split, and in a more realistic situation such a split could be in different locations from frame to frame.
Summary
I summarized all results in the table below, including all additional measures I’ve applied to improve the registration results (normalization, median filter, histogram matching). You can use the table as a rough guide to choose an appropriate registration method for your given registration problem. If you have further tips or ideas on the methods from this tutorial, or if you’d like share your experiences with image registration in Python, please feel free to leave a comment in the comment section below.
 Summary: Pearson correlation coefficients for the template image vs. the registered image for each tested transformation and algorithm.


comments