Markdown Guide
This Markdown guide is intended to provide a broad overview of the Markdown syntax while providing easy to use examples. It lacks extensive syntax descriptions and just shows practical examples that you can directly apply to your Markdown document, Jupyter notebook or Jekyll website.
Headings
The Markdown commands
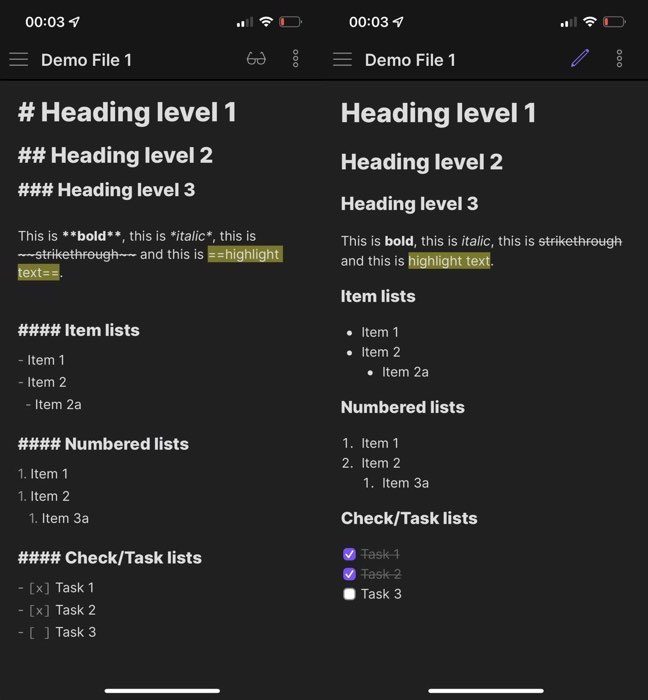
# First level headline
## Second level headline
### Third level headline
Text formatting
| Markdown Command | Rendered Text |
|---|---|
This is **bold**. |
This is bold. |
This is __bold__. |
This is bold. |
This is *italicized*. |
This is italicized. |
This is _italicized_. |
This is italicized. |
This is ***bold and italicized***. |
This is bold and italicized. |
This is ___bold and italicized___. |
This is bold and italicized. |
This is ~~strikethrough~~. |
This is |
This is a <sup>superscript</sup>. |
This is a superscript. |
This is a <sub>subscript</sub>. |
This is a subscript. |
Underlining Text: There is no Markdown command for underlining text, as this formatting is reserved to indicate hyperlinks. Nevertheless, underlining is possible by using the HTML tag <u>your text</u>, which renders to: your text.
Font color
You can change the font color by inserting the following HTML code:
This is <span style="color:blue">my *blue*</span> text.<br>
This is <span style="color:#FF33AB">my **custom** _colored_</span> text, using a hex color code.
This is my blue text.
This is my custom colored text, using a hex color code.
HTML colors: You can choose between the following predefined colors: white, gray, black, red, green, blue, cyan, magenta, or yellow. You can also use online HTML color pickers like htmlcolorcodes.com ꜛ to find the hex color code of your desired color.
Text alignment
You can force text alignment by inserting the following HTML code:
<center>
  My centered text.
</center>

<div align="center">
  My centered text.
</div>

<div align="right">
  My right aligned text.
</div>

<div align="left">
  My left aligned text.
</div>
Jekyll websites: For Jekyll websites, there are some handy Liquid tags available to align text.
Inserting extra spaces
You can force the Markdown processor to insert extra spaces by inserting the following HTML tags (1x),   (2x) and   (4x):
Here we insert one extra space.<br>
  Here we insert two extra spaces.<br>
  Here we insert four extra spaces.<br>
Here we insert indent-type extra spaces.<br>
... because inserting just extra standard spaces has no effect.
Here we insert one extra space.
Here we insert two extra spaces.
Here we insert four extra spaces.
Here we insert indent-type extra spaces.
… because inserting just standard spaces has no effect.
Keeping words together: To keep words or single characters together, i.e., prevent an automatic line break between them, just connect them with the HTML tag , e.g.: Please keep these words together . Of course, this works in HTML, too.
Line breaks
You can force the Markdown processor to insert an extra line break by inserting the HTML tag <br>:
This is my text, <br> with two extra line<br>breaks.


This is another line...
<br>

...with an extra empty line to the next line.
This is my text,
with two extra line
breaks.
This is another line…
…with an extra empty line to the next line.
Horizontal rules
***

---

_________________
render all to:
Lists
Item-lists
* entry 1
* entry 2
  * sub-entry 1
      * sub-sub-entry 1
* entry 3
- entry 1
- entry 2
- sub-entry 1
- sub-sub-entry 1
- sub-entry 1
- entry 3
Numbered lists
1. numbered entry 1
2. numbered entry 2
  - a sub entry
3. numbered entry 3
- numbered entry 1
- numbered entry 2
- a sub entry
- numbered entry 3
Initializing an item list with a number:
* 2019\. ...That was a great year!
* I think that 2019 was a great year.
- 2019. …That was a great year!
- I think that 2019 was a great year.
Adding elements to a list
You can add other elements to a list while preserving its continuity:
* entry 1
This is an extra element
* entry 2
> a quote
* entry 3
{: .align-center}
-
entry 1
This is an extra element
-
entry 2
a quote
-
entry 3

Task lists
- [x] task 1
- [ ] task 2
- [ ] task 3
- task 1
- task 2
- task 3
Links
Link to [Python](https://www.python.org).
Link to Python.
You can also add a title:
Link to [Python](https://www.python.org "Link to the Python website").
Link to Python.
You can add links also in reference style:
Link to [Python][1] via referencing.<br>
You can even re-use the [link-reference][1] as many times as you want to.

[1]: <https://www.python.org>
Link to Python via referencing.
You can even re-use the link-reference as many times as you want to.
Note: You can place the reference definition ([#]: link) anywhere within your document. For example, you can put all reference definitions at the bottom of your document to keep an overview of the available references within you document.
Displaying URLs and email addresses
You can link and display the full URL of a web-address in a single command:
<https://www.python.org>
<email@example.com>
https://www.python.org
email@example.com
Automatic URL interpretation: Some Markdown processors automatically render URLs into links even without the brackets. In case you want to by-pass this automatization, place backticks (`) around the corresponding URL, e.g. `https://www.python.org`.
Mailto links
You can insert email addresses in that way, that they open a new composing window of the default email program on your computer, when you click on the provided link:
[email@example.com](mailto:email@example.com)
Images
Link to an image on your local machine:

![]()
Link to an image from the web:

![]()
Link to an image with an alt text:

![]()
Link to an image, that links to an external address:
[](https://www.fabriziomusacchio.com/assets/images/pixel_tracker_logo_120px.png)
![]()
Attach a caption to the image:
This **is** *my caption* with a [link](https://www.python.org).
![]() This is my caption with a link.
This is my caption with a link.
Info: The description within the square brackets ([my_img]) is just the semantic description of the image. You can insert any description (e.g., [My website logo]).
Jekyll websites: For Jekyll websites, there are some more options available to insert images in Markdown documents.
Cross referencing
In-text anchors
Place an _anchor_ <a name="anchor"></a> here.
Clicking on this  [anchor](#anchor)-link will jump to our _anchor_.
Place an anchor here.
Clicking on this anchor-link will jump to our anchor.
Jekyll websites and kramdown support a shorter in-text anchor definition syntax.
Linking to headings
You can also link to headings directly without placing an anchor:
## My headline
Click on this  [link](#my-headline) to jump to "My headline".
Click on this link to jump to “My headline”.
Heading anchors are automatically generated according the following pattern: ### My precious headline 1 is accessible via #-my-precious-headline-1.
You can give headings also a custom anchor, e.g., ### My precious headline 1 {#my_id}
Tables
| First Column | Second Column | Third Column         |
| :----------- | :-----------: | -------------------: |
|  row 1       |      data 1   | **property 1**       |
|  row 2       |      data 2   |  *property 2*        |
| First Column | Second Column | Third Column |
|---|---|---|
| row 1 | data 1 | property 1 |
| row 2 | data 2 | property 2 |
Cell widths: While the cell widths might vary within your Markdown document, they will be automatically rendered with an appropriate cell-spacing.
Alignment: By placing a colon : to the left, right or on both of the hyphens within the header row, you can set the text alignment of each column to the left, right or center.
Table description: In some Markdown processors you can add a [table description] right below the table. You can even reference a table via [table description][table_reference] (you can then use the in-text anchor [#table_reference]).
Multiple lines: You can add multiple lines in a cell by inserting the HTML tag <br> to force an extra line break.
Online table generators like tablesgenerator.com ꜛ are useful tools that help to create (especially huge) tables.
Using HTML within kramdown cells
With kramdown ꜛ (e.g., used by Jekyll websites theme) it is possible to apply HTML code to cells, which enables further formatting within the cells. The only thing you have to do, is to wrap the HTML code in this expression: {::nomarkdown} HTML code... {:/}, e.g.,
| First Column | Second Column | Third Column         |
| :----------- | :-----------: | -------------------: |
|  row 1       |      data 1   | {::nomarkdown}<ul><li>property 1.1</li><li>property 1.2</li></ul>{:/} |
|  row 2       |      data 2   |  {::nomarkdown}<ul><li>property 2.1</li><li>property 2.2</li></ul>{:/} |
| First Column | Second Column | Third Column |
|---|---|---|
| row 1 | data 1 |
|
| row 2 | data 2 |
|
Acknowledgment: This solution was found in this post ꜛ by Michael Rose ꜛ.
Displaying code
In- and single-line code
`This is some code`
This is some code
Multi-line code segments
Just indent your text/code by four spaces:
    This is a multi-line
    code segment.
This is a multi-line
code segment.
Fenced code blocks:
Please use ` instead of ':
'''
This is a multi-line
code block.
'''
This is a multi-line
code block.
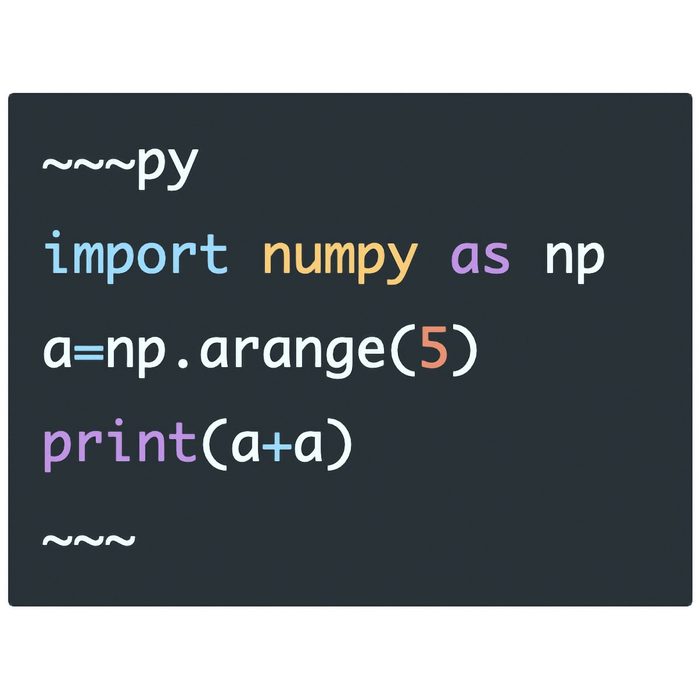
Syntax highlighting
You can also apply syntax highlighting to fenced code blocks. Please use ` instead of ':
'''python
import numpy as np
a=np.arange(5)
print(a+a)
'''
renders to:
import numpy as np
a=np.arange(5)
print(a+a)
Info: An overview of supported languages for syntax highlighting in Jekyll can be found in this post.
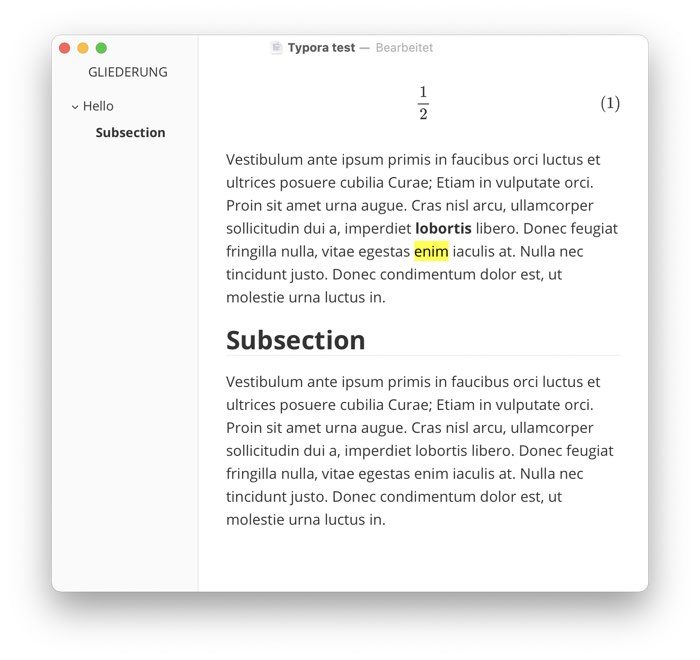
$\LaTeX$ commands
Many Markdown processors are capable to interpret LaTeX’s math mode commands in order to display a broad variety of mathematical expressions:
This $$x^2$$ is a mathematical expression within the current paragraph.
This \(x^2\) is a mathematical expression within the current paragraph.
This is a mathematical expression in its own line/paragraph:

$$a e^{\frac{\pi}{2}} + \sqrt{5}$$
This is a mathematical expression in its own line/paragraph:
\[a e^{\frac{\pi}{2}} + \sqrt{5}\]Info: In some Markdown processors you first have to enable the MathJAX support in order to use LaTeX within your document. In this post you can read how to enable MathJax.
Info: The LaTeX guide on this website contains some commonly used math mode expressions.
Footnotes
Let's place a footnote here[^1].
[^1]: Some explanation text at the end of your document.
Let’s place a footnote here1.
Citations
The following commands only work in Markdown processors that support MultiMarkdown ꜛ:
Let's cite a book[p. 99][#doebook] with some additional reference info.
Let's simply cite a book[][#doebook]. There is also a follow-up edition of that book[][#doebook2].

[#doebook]: Jane Doe, _My life as a placeholder_. Doe Press, 1898.
[#doebook2]: Jane Doe, _My life as a placeholder, Part 2_. Doe Press, 1902.
Let’s cite a book(p. 99, 1) with some additional reference info.
Let’s simply cite a book(1). There is also a follow-up edition of that book(2).
Glossary
You can extend the footnote syntax to create a glossary:
Let's place a link to a _glossary term_[^glossary] here.
[^glossary]:glossary: Glossary    Some explanation text at the end of your document to explain the _glossary term_.
Let’s place a link to a glossary term1 here.
Some Markdown processors accept also the following syntax:
This [?term1] has a glossary entry, as well as this this [?term2].

[?term1]: Definition of term 1.
[?term2]: Definition of term 2.
This term1 has a glossary entry, as well as this this term2.
Note: The glossary function might not work in all Markdown processors.
Definitions
Simple definitions:
Lorem ipsum
:   Lorem ipsum dolor sit amet, consectetur adipiscing elit.
- Lorem ipsum
- Lorem ipsum dolor sit amet, consectetur adipiscing elit.
Definition lists:
Lorem ipsum
:   1. Lorem ipsum dolor sit amet, consectetur adipiscing elit.
    2. Fusce et erat eget mauris semper aliquam in non nulla.
- Lorem ipsum
-
- Lorem ipsum dolor sit amet, consectetur adipiscing elit.
- Fusce et erat eget mauris semper aliquam in non nulla.
Blockquotes
> This is my first level quoting.
>> This is my second level quoting.

> This is my first level quoting with a citation.
<cite>Joan Doe</cite>
This is my first level quoting.
This is my second level quoting.
This is my first level quoting with a citation. Joan Doe
Note: The <cite> command might not work for every Markdown processor.
Backslash masking
If you want to use a sign, that is by default interpreted as Markdown syntax (i.e., as a markup) by your Markdown processor, place a backslash \ in front of it. The following signs are reserved as default Markdown markups:
| Reserved Markdown markups |
|---|
| * - _ () . ! {} [] # ` \ |
Variables
In some Markdown processors you can define variables and use them as placeholders everywhere within your text:
my_var_1: dog
my_var_2: cat

My _[%my_var_2]_ is in love with my **[%my_var_1]**.
My cat is in love with my dog.
Text folding
You can implement a collapsible text section by using the following HTML code:
This is some visible text.
<details>
<summary>Toggle hidden text</summary>

<br>

This is some hidden text.

'''python
# you can even use it for code folding:
import matplotlib.pyplot as plt
import numpy as np
plt.plot(np.arange(5), np.arange(5))
'''
</details>
This is some visible text.
Toggle hidden text
This is some hidden text.
    # you can even use it for code folding:
    import matplotlib.pyplot as plt
    import numpy as np
plt.plot(np.arange(5), np.arange(5))Note: Place an empty line after the closing </summary> tag, otherwise the Markdown text won’t show correctly. Also, place an empty line after the closing </details> tag.
References and further readings
This guide was created by gratefully using the following sources: .
- Ryan Grove’s MultiMarkdown Guide ꜛ
- Matt Cone’s Markdown Guide ꜛ
- https://github.com/fletcher/human-markdown-reference ꜛ
- https://daringfireball.net ꜛ
- Daniel Greenfeld’s Markdown Guide ꜛ
- https://jupyter-notebook.readthedocs.io ꜛ
- https://www.datacamp.com/ ꜛ
Further readings
- Freely available Markdown editors
- How to enable $\LaTeX$ in Markdown documents
- $\LaTeX$ Guide
- Markdown vs. $\LaTeX$ for Scientific Writing
- Using Markdown for note-taking
- MultiMarkdown ꜛ
- kramdown ꜛ
- Why You Shouldn’t Use Markdown for Documentation ꜛ by Eric Holscher (March 15, 2016)
- On the history of Markdown:
- Introducing Markdown ꜛ by John Gruber (March 15, 2004)
- Dive into Markdown by John Gruber (March 19, 2004)
- Markdown ꜛ by Aaron Swartz (March 22, 2004)
- The first online Markdown renderer ꜛ (2004)

This work is licensed under a Creative Commons Attribution-NonCommercial-ShareAlike 4.0 International License (CC BY-NC-SA 4.0) ꜛ.


